How to Determine the Quality of Software / Web Applications

April 25, 2011 Add Comment
It is not easy to determine the quality of a software or desktop and web applications. Techniques how to determine the quality of software continues to grow in accordance with the development of technology today.


If we look for bugs in the software, we actually will not know exactly how many bugs are contained in it.

Constraints in How to Determine Software Quality


Here are some points that become the reason why determining the quality of software is not easy.
If a programmer tests the program for his own work, the tendency to assume that the program he created is really good could happen. This does not mean that programmers should not test. Testing is limited to unit testing only.

Testing a software takes a long time. So, if the programmer also perform testing then the main task, that is making a program, should be postponed first.

When a programmer tests generally he tends not to record the errors found. If it is done it can happen that bugs that have been found are not fixed.

If we examine further, to get a good software quality, separate program tester is required. However, even if there is a tester, testing can not guarantee the quality of good software.

This depends on several things like good test case design, which can cover almost all possible program errors that occur.

Improper test case design will cause escape test. Escape test can occur because A low fidelity test system, testing the system that includes almost all the features but the very important feature is not tested.

Usually this happens because of poor engineering. The second possibility is the occurrence of a regression test gap, ie the test case does not include where the bug was found. Generally this happens because of limited time or resources.

To manage your software development properly, visit the " How To Manage Application Software Development " tutorial .

Conclusion How to Determine Software Quality


To get a good software quality needs a special division for software testing.

The design of the test case plays a role in determining the quality of the software, when the design of the  test does not cover all the important features, so it can happen low fidelity test or regression test gap. Both of these cause the bug to pass the test.

The purpose of the testing division is to not only look for bugs. The scope of this test includes the performance of the software viewed from the response time when the amount of data and its users a lot, reliability reliability of a software, security, efficiency, and maintainability.

Develop Websites with Bluefish in ubuntu

April 06, 2011 Add Comment
Develop Websites with Bluefish in Ubuntu


Linux is at the forefront of web development, and Ubuntu is a great distribution to use to build and design a website for the first time. Recently, I've been developing web applications using frameworks, and Linux in general makes these things quite a bit easier. Therefore, I figured I should present some of the basic tools you can use to create, develop, and host a website. This may abstract a bit away from the idea of "applications" in and of themselves, but I thought you may all be interested anyway.

The most logical first step for most users is selecting a development environment. Today, I'll highlight Bluefish. Later on, I'll focus on a WYSIWYG editor. (Which, by the way, is kind of difficult to find. Please, if you have any ideas, leave a message in the comments.)

Of course, to put your webpage on the Internet, you'll probably want to use a reliable web hosting. There's about a million out there, and it's hard to figure out the differences between them. I used to have a site on Bluehost, but I eventually cancelled because I thought their support was poor, and I didn't want to fax in a copy of my driver's license just to have SSH access so I could use Rails. I switched to ThinkHost a few months ago, and I've been really happy thus far. They offer reliable Linux hosting with unlimited bandwidth, space, and domains. Better yet, the servers are powered with wind and solar energy, and they plant a tree on your behalf.

Bluefish is a code editor, so users should have a basic understanding of XHTML and CSS, along with any other development languages. I learned HTML rather painstakingly from an outdated code reference, and I don't recommend you do it that way. Instead, try HTML & XHTML: The Definitive Guide published by O'Reilly, which can help even the most talented developer learn new tricks. In fact, it taught me all about the <label> tag, and I felt kind of dumb for previously embedding form labels in only a paragraph tag and wrestling with CSS, but alas...


One of the nicest things about Bluefish is that it uses 30 to 45 percent less memory than other editors. This makes quick edits less of a hassle. Sometimes, other editors can be too clunky, and I found myself reverting to a console-based text editor to make a minor change, but Bluefish should stop this from happening. It has built-in project support, so you can easily open multiple files and keep them organized in the right path. It has all the standard stuff, like line-numbers, search and replace, and code highlighting for languages like HTML, Ruby (go Rails!), Python, and PHP. Best of all, the menu bar allows you to instantly drop in code that developers use often.
Bluefish allows you to connect to a remote server and edit files, so here's a quick guide to using Bluefish with ThinkHost. This tutorial assumes you are using GNOME, though I'm sure you can do the same thing with KDE.
Click on the "Places" menu, and select "Connect to Server...".
In the dialog box, type in your FTP address in the "Server" box. You should be prompted for a username and password.
Now, open up the mounted server in Bluefish, and now you can easily edit and save all of your files on Thinkhost.

Comcast XFINITY TV App For Android

March 25, 2011 Add Comment

Comcast XFINITY TV App For Android


Comcast has officially released its XFINITY TV app for Android which allows users to browse current television listings and watch on-demand content. With XFINITY TV app, users able to watch favorite On Demand shows and movies right on Android devices for on-the-go entertainment. Xfinity TV app for Android comes with features such as ability to remote control cable boxes, record TV shows, schedule DVR recordings, search the VOD library, change channels, tune directly to on-demand programs in the catalog, and tuning to VOD on the TV.

Features of XFINITY TV app for Android:


  • Browse TV listings customized in your area.
  • Browse an On Demand library featuring thousands of titles.
  • Search TV listings and On Demand for any show or movie.
  • Filter content by genre, network, HD, free and much more.
  • Control your TV and DVR.
  • Conveniently change channels right from the app.
  • Tune directly to On Demand programs to watch on your TV.
  • Schedule DVR recordings of your favorite shows, series, and movies.
  • XFINITY TV app for Android is completely free and available in the Android Market, but does require a Comcast subscription to use. Users need compatible set-top box or DVR from Comcast that can accept commands from the app. Once installed XFINITY TV app on device and connected to Comcast account, users can control cable box or DVR in anywhere through the device.

How to Hosting a WordPress Blog Website using CPanel

March 15, 2011 Add Comment
How to host a website or blog is very easy if we use CPanel, another story if we use a hosting venue or still not installed anything, we must prepare mysql (for those who use mysql), apache (for those who use php) other.

In the previous tutorial we have discussed how to register the domain, if not please visit the tutorial " How to Register Domain Blog Website Complete " and now it's time we discuss the tutorial how to web hosting or blog with cpnel. Oh yes, in web hosting or blog, whatever it is the kind of blog or its web, the way is still the same. The basic steps are as follows:

  1. Set up local database (can be dumped first)
  2. Prepare php files or similar (asp or other)
  3. Filezilla or other upload tool (ftp)
  4. Where to host (yes yes it is)
  5. Make sure the hosting place is available where our database and php running (usually there is cpnel for this)
  6. Setting the local database settings to the hosting database on the connection php file connection
  7. Testing and running

How to Hosting a WordPress using CPanel

Note the point number 5 above, so that the tutorial is not too widened, in this tutorial we just discuss how to web hosting or blog with cpnel. For those candidates where his hosting does not exist CPanel, will be made a special tutorial to install the mysql and apache database manual. For the type of blog or website we will be hosting in this tutorial is "WordPress".

Still remember the tutorial " How to Install WordPress Offline in Xampp Manual ", there we have installed wordpress locally on our pc, usually this way taken in the framework of development theme. In this tutorial, we will be hosting our local wordpress blog to a hosting provider which of course has provided CPanel.

By following the process in this tutorial, we will move all of our content on localhost (posts, pages, images, etc.), templates, and plugins from the local server to the hosting site.


Step One: Export the WordPress Local Database

The first thing we need to do is export the Local Database database. We will use phpMyAdmin to export. To access phpMyAdmin just type the address http: //localhost/phpmyadmin/in the browser and click the WordPress database. Next, click the Export button on the menu bar.


  • Note that what is exported is the database that we want to host
  • select export menu
  • Export menu
  • Select Custom
  • Select All Tables
  • Compression, select gzip

In the Export Method option select a custom method, which will give us more options to export the database. Select all tables for export and gzip for compression. Scroll down to the bottom of the page and press the Go / Send button to download the database.

Step 2: Uploading a WordPress File (WordPress Hosting)


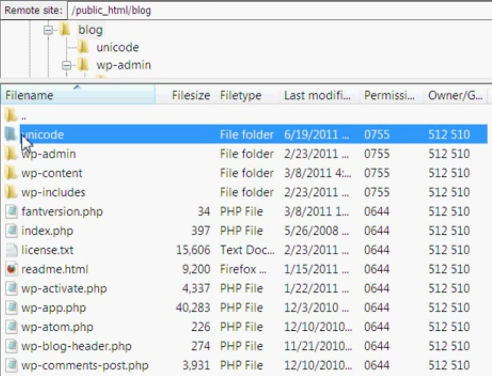
Now open FTP software and connect to web hosting. Once connected to the site, make sure we upload the files in the proper directory. For example if we want the site to be hosted on yoursite.com, then we will upload all the files in the public_html directory in the hosting server.


  1. Local wordpress web address
  2. Web hosting address
  3. Select all files, right-click and select upload

Step 3: Create a MySQL Database in Server Hosting

When FTP uploads WordPress files, we can all import the database to the hosting server. Because this tutorial discusses how to host a wordpress blog with CPanel, so we will discuss how to create a database using CPanel. Login to the CPanel dashboard and click on the MySQL database icon that can be found in the database section.

After creating the database, scroll down to the MySQL user section and create or add an existing user to the database. After adding the user, CPanel will take us to set the MySQL privilege for that user. Just give all the privileges to the user we just added or created earlier.

Step 4: Importing WordPress Database in Server Hosting

The next step in this process is to import the WordPress database. Please go to the CPanel dashboard, scroll down to the database section and click phpMyAdmin. This will take us to phpMyAdmin.

phpMyAdmin will show you the new database we have created earlier. Click on the Import tab in the top menu. On the import page, click on the file select button and then select the gzip database file (the gzip file we created in the previous step). Finally, press the Go button at the bottom of the page. phpMyAdmin will now import the WordPress database.

Step 5: Change the Web URL

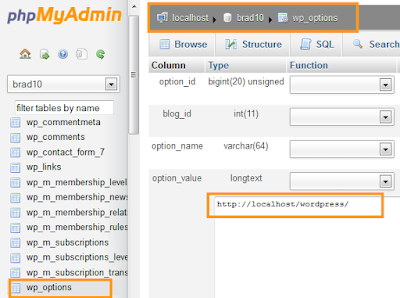
Now we need to change the URL of the web or blog, so we can make the WordPress website can be accessed online. In phpMyAdmin, look for the wp_options table in the database we just imported in step 4. If you change the database prefix, then not wp_options.

Click on the browse button (browse) next to wp_options or links on the sidebar to open a page with a list of fields in the table wp_options. See image below:


Below the field options_name, look for row with value siteurl. Click the Change icon that can be found on the far left at the beginning of the line.

When you click the edit icon, a new window will appear. In the input box ' option_value', we will see local URL like: http://localhost/wordpress. Be careful to enter new site urls in this field, for example: http://www.yousite.com. Save by clicking the Go / send button. Do the same for a field options_name containing home.

Step 6: Setting Database Connection


Now that we have imported the database, and all our content has been uploaded, it is time to configure WordPress. At this time, if we try to access the site, then our site will menu error page in the form of database connection error.

Step 7: Fix Image Url and Broken Link with Update Database


Every time we move a WordPress site from one domain to another, or from a local server to a Hosting site, we will find broken and missing links that also cause problems with image loads. We can use SQL queries or use the WordPress Velvet Blues plugin .
For those who want to do it via SQL, here is a simple SQL query that can solve this problem:


Conclusion How to Hosting Blog or Website

tutorial How to Hosting Blog Website WordPress CPanel , may be useful for visitors. Oh yes, hopefully web that has been uploaded can run perfectly. Do not forget to immediately check the site to make sure that everything works as well as expected.

If there is anything to be asked about any problems and questions please feel free to comment below and we will try to help as much as we can.

For other settings, we can learn  through the Awesome Examples Fonts page . In the page, we can set the icons to rotate, reversed, given the border and much more. Similarly tutorial install and use the Awesome Font. Similarly tutorial how to install and use awesome fonts , Need to know if in previous version (version 3.2.1), Awesome Font changed the calling code of icons and also on the link from Netdna to MaxCDN , for that before deciding to update the icon, we must learn more about how to retrieve the link and call the icon (fear that there is another change).


Windows 8 to Integrate Xbox Live Gaming and Entertainment Service

March 10, 2011 Add Comment

Windows 8 to Integrate Xbox Live Gaming and Entertainment Service


Xbox Live online multi-player gaming and digital entertainment service first introduced on Xbox 360 game console are one of the few markets that Microsoft really succeeds in. Thus it’s kind of expected that Microsoft wants to bring the online gaming and entertainment experience to all kind of devices and platforms. The long term initiative is called Live Anywhere where among targeted platform is Zune, Windows OS, and Windows Mobile phone, in addition to Xbox.

Microsoft already integrates Xbox Live into Windows Phone 7 as one of native feature, and will also integrate Xbox Live natively into Windows 8, as one of new features of Windows 8. In fact, Windows XP, Windows Vista and Windows 7 already has an online gaming platform based on Xbox Live called Games for Windows – Live, where all users also get to download Tinker PC game for free. But Games for Windows – Live is not come pre-installed on Windows, nor tightly integrate with Windows, and it’s mainly tilted towards gaming. In Windows 8, Xbox Live will be tightly integrated, and expands beyond gaming with digital content delivery to make Xbox Live the core entertainment service.

According to Mike Delman, vice president of global marketing at Microsoft’s Interactive Entertainment Business group, when he was interviewed by Seattle Times, “Xbox Live will be built into the PC. It will be the service where you get your entertainment. We were talking about it — you will not just see consoles and handhelds at this show next year, this show’s going to morph into other devices.” With the availability of Live TV and VOD (video-on-demand) from major cable networks and service providers, Xbox Live is gearing up to fight off increasing competitive market in providing entertainment services, chief among all, the iOS ecosystem of iPhone, iPad, iPod touch and Mac OS X with iCloud and cloud-based iTunes offerings.

Mike Delman also gave some clue on how Xbox Live services and content be part of Windows 8:

There will be a lot of similarities in design and service philosophy. Whether it’s us or Apple or anybody else, people want to be able to navigate through multiple devices in a certain ecosystem very seamlessly so we’re committed to that.

And the Xbox Live will also go the way of “buy one play it anywhere”. Xbox Live has already built based on cloud service concept, and with Xbox Live been integrated more and more platforms and devices, Microsoft promises Xbox Live will be the pervasive cloud media service across devices, that works with Windows PC as well as Windows Phone and Xbox.

It’s our job to make “buy a movie in one place and play it everywhere, buy a game in one place and play it everywhere.” Making things portable will be a big focus of ours.

Microsoft has already prepared Xbox Live to elegantly blending into the new Windows 8 and Windows Phone 7 tile-based user interface. During E3 keynote address, Microsoft revealed that Xbox Live will have a new Dashboard design, which is also based on the “live tile” on immersive Metro UI.

Backup+Restore+OEM+MAK Activation with 7Tokens Manager: Windows 7

March 07, 2011 Add Comment

Backup and Restore Windows 7 Retail, OEM and MAK Activation with 7 Tokens Manager


There is a limit to number of times activation of Windows 7 can be made online automatically, even though the product key been used to activate Windows 7 is genuine and legally paid for. The online activation limit brings inconvenient to Windows users who love to reformat and reinstall Windows more than frequently, causing them to fall back to time consuming and cumbersome phone activation with many numbers crunching. Callers have to enter installation ID which consists of a total of 54 numbers in 9 groups of 6 numbers with phone’s keypad, and then receive a confirmation ID made up of 48 numbers in 8 groups of 6 numbers to enter on Windows 7′s activation wizard.

To avoid the dreadful phone activation, and possibly to avoid contacting Microsoft for the purpose of activation to protect privacy, there is undocumented way to preserve current Windows 7 activation status by backing up several software licensing related files with the product key, and then restore them on the reinstalled Windows 7 system.

Windows 7 system activated by restoring backed-up activation status works exactly the same with system that is activated online or by phone, but in offline mod without the need to connect to Microsoft’s activation server or even Internet access.

Instead of having to manually copying the required system files and retrieving the product key, there is a software utility called 7Tokens Manager that automates the activation backup and restore procedure on Windows 7.

7 Tokens Manager, developed by Josh Cell, makes a complete backup of Windows 7 activation, which can then be used to be restore in a new installation to achieve instant offline activation. No further activation step is required.

Features of 7Tokens Manager:

  • Backup any type of activation license from retail, OEM or MAK distribution channels.
  • Automatically backup digital certificate, product key (serial number), tokens dat and other other license files.
  • Dynamic interface.
  • Very lightweight and fast, though it may takes up to 5 minutes to restore activation due SLMgr.vbs working.
  • Programmed with security features.
  • Compatible with all editions of Windows 7, namely Windows 7 Starter, Windows 7 Home Basic, Windows 7 Home Premium, Windows 7 Professional, Windows 7 Enterprise (not support KMS activation though) and Windows 7 Ultimate).


Cyber Link Photo Director 2011

February 03, 2011 Add Comment

Get Cyber Link Photo Director 2011 Free By Feedback on Beta


Cyber Link Photo Director 2011 is a new professional photo editing and management software from Cyber Link, which is famous for its video editing and video player multimedia applications, Power Director and Power DVD. Photo Director 2011 set to join a competitive market which dominated by advanced graphics editing software, Adobe Photoshop.

Features of Cyber Link Photo Director 2011 includes:


  • Dynamic Adjustment Tools – Enhance specific areas of photos with amazing Adjustment Brushes, reduce noise, sharpen photos, or adjust the White Balance or Tone to bring out the spectacular color of your images.
  • Locally apply precise brush adjustments and use Fit Edges for super accurate results.
  • Non-descrutive environment and adjustment history to go back to any revision step without damaging original photos.
  • Intuitive workflow designed to smooth the flow from import, manage, enhance to final output.
  • Native RAW Support for RAW files from Canon and Nikon cameras allows you to experience the most authentic color when decoding RAW file formats.
  • Save enhancements as adjustment presets. and upload to DirectorZone.com directly from PhotoDirector 2011 to share them with other users.
  • Download an unlimited number of presets created by other users from DirectorZone.com.
  • Efficient organizer with advanced tools for easy management and selection.

CyberLink Photo Director 2011 hasn’t been officially launched yet, but the developer has released a beta version of CyberLink PowerDirect 2011 during Computex 2011. To entice participation in the beta program, CyberLink is giving away free license for final version of CyberLink PhotoDirector 2011 at no charge, for beta participants who provide valid feedback to improve the softaware before June 20th, 2011. A license of CyberLink PhotoDirector 2011 is valued at $99.95.


Only beta participants who are over 18 years of age are entitled to receive the full version of CyberLink PhotoDirector 2011 after completing a simple PhotoDirector feedback form related to how participant experienced PhotoDirector by June 20th, 2011. Even if you decide not to submit the feedback, the beta version of CyberLink PhotoDirector 2011 also works as a 90 days free trial version for 3 months free usage.

MOZILLA TO DEVELOP OS BASED ON ANDROID!

February 02, 2011 Add Comment

MOZILLA TO DEVELOP OS BASED ON ANDROID!


Mozilla, who are renowned for their successful internet browser, are entering the mobile race, developing a new web-centric OS that will directly compete with Google, Apple and Microsoft.

If the name Mozilla rings any bells it's because they're the tech boffins who put together Internet Explorer, the browser that Windows defaults to. Mozilla took the leviathan computing company on with its Firefox browser, and today it stands as the second most popular browser worldwide.

Now the company who was underdog to Microsoft looks to be playing the same role, but this time against internet mogul Google.

Announced on the Mozilla discussion forum, Mozilla have begun coding for phones and tablets. The BBC revealed the mobile operating system will draw on Android code, with Mozilla writing as much fresh code as possible. The hybrid-like operating system will be named Boot To Gecko. 

It is an unusual name for an OS, until you remember Gecko is the rendering engine employed by the Firefox browser that interprets web page coding and displays it in a screen-friendly format, a homage to its origins.

Even though Android coding will form the operating system's foundations, Mozilla hope to add a much more open wrapper around it than Google currently do, making it more versatile as an operating system.

Its shared foundations will also make Boot To Gecko compatible with the same phones as Android, competing as a direct alternative to Google.

Often, when you select a link from an application native to the Android or iOS market, the operating system will have to open a new webpage in the browser. Boot To Gecko aims to limit this by making applications much more web-centric.

If the venture proves successful, Mozilla will be waging war against industry giants, with Google, Apple and Microsoft dominating many facets of the technological world. 


Mozilla have acknowledged the project is in infancy and have chosen to make the development public in hope it will attract talented enthusiast coders who will contribute to the Boot To Gecko's cause.

According to their project team, all of the code development will be completed and shared with the public as soon as it is written.

Researcher Andreas Gal, who announced the development, admits the company has set a high target, but wants to do it "the way we think open source should be done.

Gal says his ultimate goal is to break "the stranglehold of proprietary technologies over the mobile device world," implicitly referring to the practices of Apple, Windows Phone and Google.

SEO friendly Image for Blogger - SEO Tricks

January 19, 2011 Add Comment

SEO friendly Image for Blogger - SEO Tricks


If you are a blogger and wants to be professional i.e., want to earn money from blogging then you must optimize your blog for search engines i.e., SEO (Search Engine Optimization). The main source of getting traffic / new visitors to your blog is through search engines like Google.com, yahoo, Bing, Ask. But, by default blogger.com/blogspot.com blogs are not optimized for search engines. So, to make your blog SEO friendly you need to manually add alt and title tags for each image you post / upload on your blog. Its a kind of irritating thing to manually add alt and title tags for each image. Anyway blog owners / webmasters can't add alt and title tags for each images they posts. Well, not anymore! Here is a script that'll automatically add the alt and title tag for the images that you post on your blog.


USE OF THIS SCRIPT:
Anyone who searches for images in major search engines like Google.com, yahoo, Bing, Ask will be redirected to your blog if they click on your uploaded image which helps your blog in gaining extra amount of traffic and new blog visitors to your blog. I guess you understood the importance of adding alt and title tags to your blog. Trust me I can assure you after adding this script to your blog it will rank better than before on search engines. Important thing about this script is that, it'll add alt and title tags for all the images however it may be the one you are going to post or the one that already exists in your blog.

HOW IT WORKS? 
The script just uses the name of your image to auto generate the "alt" and "title" tags. In other words, the name of your image stands as the text for your alt and title tag. It picks up the next character after the last instance of "/" from the image URL link as the starting letter to your alt or title tag. The ending character will be recognized using the last instance of "." from your image URL link.


Considering an example, if you upload an image "seo-script.jpg" using post editor or via mail2blogger. You'll find the URL of the image as "http://1.bp.blogspot.com/....../seo-script.jpg". When you publish the article of the uploaded image then go check out the source code of the same (source code of the uploaded image), you'll find the following tags in it - alt="seo-script" and title="seo-script". Hope its cool......! Stop more manual addition of tags! Save your time :) Just selecting a proper name (keyword) for the images and the script will do the rest and next!


Don't forget to keep these two things in your mind before you name/upload an image.
1. Don't use these two "/" and "." characters when you name to upload your blog post images.
2. Use a name that suits and clearly explains the image for better search engine rankings and for better SEO.


STEPS TO INSTALL THE SCRIPT IN BLOGGER:
1. Log In to your Blogger account >> Dashboard >> Click on "Design" Tab >> Next "Edit HTML" and before editing make a backup of your blog template by clicking on the "Download full template" link at the top of the page. Tick Expand Widget Templates box. Once the backup is over, by clicking Ctrl + F search for the below code in your blog HTML code.

</body>

2. Copy and Paste the IMAGE SEO SCRIPT FOR BLOGGER just above the </body> tag line mentioned in step 1.

<script src='http://ajax.googleapis.com/ajax/libs/jquery/1.3.2/jquery.min.js' type='text/javascript'/>
//SEO SCRIPT POWERED BY NISARGA - Blogopers.blogspot.com
<script type='text/javascript'>
//<![CDATA[
$(document).ready(function() {
$('img').each(function(){
var $img = $(this);
var filename = $img.attr('src')
$img.attr('alt', filename.substring((filename.lastIndexOf('/'))+1, filename.lastIndexOf('.')));
});
});
//]]>
</script>

<script type='text/javascript'>
//<![CDATA[
$(document).ready(function() {
$('img').each(function(){
var $img = $(this);
var filename = $img.attr('src')
$img.attr('title', filename.substring((filename.lastIndexOf('/'))+1, filename.lastIndexOf('.')));
});
});
//]]>
</script>

Protogon File System in Windows

December 10, 2010 Add Comment

Protogon File System in Windows 

The early leaked builds of Windows 8 reveal a new file system codenamed as “Protogon”. The “Protogon” file system in Windows 8 M2 or Windows 8 M3 builds appears to be still in its infancy prototype, but has been rumored to be a sub-child file system of NTFS which will be named as NTPFS, as it’s is supported with NT Protogon FS kernel mode driver.

As no announcement from Microsoft is available for Protogon file system, many guesses have been made about it, mainly based on history of file system development by Microsoft. As such, Protogon can be resurrection of WinFS (Windows Future Storage), a data storage subsystem that originally been planned to include with Windows Vista but finally been scrapped, with some components utilized by ADO.NET and Microsoft SQL Server instead. Protogon may also be continuity of JET Blue Extensible Storage Engine (ESE), an Indexed Sequential Access Method (ISAM) data storage technology used by Microsoft Exchange Server and Active Directory.

Early test of Protogon file system indicates that it indeed works faster than NTFS file system on Windows 8, and it occupies less space on disk when comparing with NTFS and FAT32 or FAT. But whether the new file system will be included on final release of Windows 8 is unknown. Ironically, Protogon has a PROTDEAD in its HEX header.

In order to create a partition or volume which has the Protogon, a drive, partition or volume has to be reformatted to convert to Protogon file system, with the following steps revealed by _alex_:

Press Ctrl + Shift + F10 to open Command Prompt window.
Type in the following command and hit Enter:
format X: /FS:protogon /Q


Replace X with the actual drive letter for the drive, partition or volume which you want to format with Protogon file system. The /Q switch makes sure that conversion to Protogon file system takes few seconds instead of long wait.


After formatting a volume as Protogon file system, a warning message of “Please be advised that the underlying format may be incompatible with near-future versions” is displayed, indicating that the file system is ready for prime time yet, and may have undergone further change in development, if the new feature makes its way to final build after all.

Note that many Windows 8 components do not recognize Protogon file system yet. For example, chkdks will treat it as RAW file system, even though Disk Management and Windows Explorer can properly show the file system as Protogon. When an external drive with Protogon file system, you will be asked to format the disk in order to use it if you unplugged the drive and reconnect it. And, of course, the Protogon file system won’t be incompatible with Windows 7, Windows XP, and all other operating systems now.