Showing posts with label Cpanel. Show all posts

How to Create new website

June 15, 2016 Add Comment

How to Create new website


On this occasion admin will share tutorials How to Create a Complete Website With Images, will be peeled in depth step by stage. This tutorial is suitable for you who still lay, if you are skilled you can skip directly on the optimization only.

Many options how to create a web, it is up to you in choosing a way, because it chooses how it depends on your goal to create a web. From the easiest to the hardest way it's all your choices, obviously every way there are advantages and disadvantages.

What is the Web


The Web is a page that contains both written content, images and videos that can be accessed online (of course according to privacy rules). For those of you who want to sell online or create an online store, want to create a personal blog that contains even want to start an online business it takes the ability to create a web, not hard to know how.


Why Must Have Web or Blog


Almost every business owner has a web to introduce themselves and their products to support the brand, existence and sales. If you are a businessman, do not let you miss the competitors who already have the web.

By knowing the advantages of having a web, it's time you decide your goal in creating the web. Why should you do this early? Because this will greatly affect the appearance, web structure and web end results.

Step - How to Create a Website


Okay enough introduction with web and blog, let's start step - step in how to make web. In order to understand and get maximum results learn slowly

 Specify a Domain Name and Give a Web Name

Domain is your web address, with that address people can visit the web by typing the web address in their browser. For example this web has address, which need to be considered in choosing a web address or domain is make sure the address is easy to remember and not too long so it allows visitors to remember the web address.

Tips on choosing Domains you need to consider:

  1. Most webs that want to aim business using the suffix. Com or. Co., If the suffix was already purchased by others and it was sold, try to buy it.
  2. You may also consider using the .biz or .net domain suffix if the .com domain is not available.
  3. If you have a specific purpose for transactions for example Indonesia area only then use .id, if the American area use .us and so on.
  4. Do not be too push in choosing a domain name, you can use additional words in front or a suffix. For example if the domain baca.com already purchased, try to add the word front me so baca.com or the ending to be bacak.com
  5. Buy a domain with a minimum period of three years, so no one is trying to take advantage of your negligence in the domain renew.
  6. If you are worried that your domain name is being misused, try buying some other domain suffix.

How to Sign / Buy Domain Name


After you decide the domain name you want, it's time you immediately buy the domain so that the domain is not triggered by other parties. Many places to buy domains, can be domestic or overseas, are clear in buying domains consider the following tips:
  1. Do not check the domain name repeatedly on the web that does provide domain name purchase services, in some cases the domain name will be immediately purchased by the web provider because it is considered a lot of demand so that the selling price will increase.
  2. If you want to buy abroad make sure already have a credit card, because the author's experience using paypal only credit cards that can be used (If there are other tricks please add in the comments column).


Determining Techniques How to Create a Website


Okay now you have a domain, the next is to determine the techniques in how to create a website, because in making the web there are several ways we can do and this greatly affects the results itself.

As already said in the opening words that every technique has its advantages and disadvantages, this is a straightforward technique for creating a popular website:

  1. Hosting and Free Domains
  • Blogspot: Please go to the tutorial " How to Create Blog in Blogspot Complete Picture "
  • WordPress.com: Just go to Tutorial " How to Make Blog in WordPress Free Complete "
  1. Hosting and Paid Domains
  • WordPress.org: If you intend to use CMS wordpress and upload it yourself like this web, please follow this tutorial until it runs out
  • Other CMS -Content Management System: Like CI (Code Igniter) for example CMS.
  • Hand Coding: Make your own from scratch

For more details please go to the tutorial " Some Ways to Make the Most Popular Web ". For those of you who opt for how to create a website using CMS WordPress or do not use the free hosting facility, please continue reading the tutorial. For those who do not, please take the essence of advanced tutorial, because basically the same is just different technique.


How to Install CMS WordPress On Offline PC


Before web hosting, we should download the WordPress CMS file at wordpress.org , by trying offline first, we will get benefits like:

  1. You do not have to connect online for frequent changes (often change theme, plugin optimization until theme optimization)
  2. By not being connected online, the speed in optimization is increased when compared to optimization after the web is hosted online.
  3. Obviously we've saved the quota
  4. Make sure everything is in accordance with the desired start of the design until the optimization of loading speed.
  5. If indeed there is a change, we can change it when the web is online, because the changes are only slightly.

Building a Website Structure


After you install CMS WordPress or other CMS, our next task is to start building website structure. This is very important because it discusses what pages you want to display on your website.
The structure of your web site depends on the purpose of creating your web. For example, if you create a web for the purpose of creating an online store, then the web page you need is as follows:

  1. Home Page (Home)
  2. Product page or catalog
  3. Company Info or about us
  4. Payment page
  5. Contact page / contact page
  6. Blog tool to influence your prospective customers.

How Web Hosting Has Been Created


Adding Content or Web Pages / Blogs


The web is online and we can add articles or tutorials. In this section will be discussed the importance of creating appropriate SEO content, what are the advantages of making an appropriate SEO article? Here are some important points:
  1. Content will soon be indexed by Google
  2. Content will have a good position in the SERP
  3. Not easily shifted by competitors who have similar content
  4. Increase your web ranking
  5. Increase the trust of potential customers (the content contains reasons that support your merchandise).
  6. Strengthen the Brand that you build, because if a lot of your content is weighted it will add strength to your brand.
  7. And many more

Web Optimization / Blog


The last thing is no less important is to optimize your web. Optimizations include:

  1. Blog loading speed
  2. SEO
  3. Blog Security
  4. Back-Up function

Conclusion How to Create a Website

Similarly tutorials How to Create the Latest and Complete Website , there are still shortcomings that the author has not conveyed due to this limited media. For other tutorials related to making the web can visit the Website Categories page .



How to Accelerate Loading Website Blog Complete

May 13, 2016 Add Comment

How to Accelerate Loading Website Blog Complete


Tricks how to speed up blog website loading should be applied to all the web. Because all would agree if all visitors liked the web fast when loading its content. It is true if loading the website related to the speed of your internet, which need to know that is not always true if the faster your connection the faster loading web.

Why? Because if your web requires a very complicated computation, then the connection speed is not so helpful (the problem is on the server, so it takes time for the content to be ready to send to the client), moreover we want that all types of connections either slow or fast will be served well, then our effort is to optimize server performance in computing until content distribution and strive for content to have very small size.

If you have a web that has a lot of scripts like css, javascript and fonts all of which are big in size, it's ensured that the longer the server performance in the compilation and content distribution. In this tutorial we will discuss the basics and general, both for Wordpress and blogspot, for details of each step will be delivered in its own tutorial.

The Benefits of a Fast Web Loading or Blog

Lots of benefits that we will get, not only the satisfaction of visitors that we get, even this benefit is also felt for web owners who use the web as a field to make money. Here are the details of the benefits of having a web with a high loading speed:

  • Improve SEO rankings (Google wants the best)
  • Improve UX (User Experience), give a good impression for visitors. This is very important if your visitors are potential buyers of products.
  • Lighten the bandwidth burden, the more optimal it will reduce the amount of content distribution.
  • Lighten for visitors with slow connections.
  • Lastly, you also hate the slow web right?

Detail Speed ​​website affect UX (User Experience), I will quote from some websites, note the following details: 

From Aberdeen Group, a 1 second delay upon opening the page will cause:

  • 11% fewer visitors will blur
  • 16% decrease in visitor satisfaction
  • Losing about 7% of the conversion
  • Amazon has increased revenue ranging from 1% for every speed increase over 100 milliseconds.

  • Walmart too, has a 2% increase for every 1 second increase.


A study from Experts found that:


  • 47% of visitors expect the web at 2 seconds.
  • 40% will leave the web at 3 seconds and above.
  • 52% of online shoppers say the speed of the web is what keeps them loyal.
  • It's enough right ?, okay let's directly discuss the steps of each step how to speed up the website loading website or blog page.


Steps to Accelerate Loading Blog and Web

In this technique we will try our loading speed as optimal as possible, note that we do not have to apply all the steps to be explained, do it wisely and keep the direction of each step.

Steps will be divided into two categories:


  1. Server
  2. Content Elements


Before starting, please backup your website or blog first.

Server

In the case of a server, you can start doing the optimization by choosing a good place in terms of support and easy in performing server optimization. Do not let you get constrained because the rules of hosting providers that complicated this should be and this is limited. Let's start doing the optimization, and try to change your web to maintenance mode so as not to disturb the visitors.

Cache Browser

By utilizing the browser cache, you can trim loading for frequently loaded files like CSS, JS and images. The way it works is on the first visit the client browser will load the content from the server and will store in the browser cache, by storing the content in the browser cache then for the next visit the browser will not request content to the server but will load the browser cache.

The trick is as follows:

htaccess

By adding an expires header setting to the htaccess file, you can set the file type and cache time to last. In this tutorial I use the usual example settings and pass the Google Page Speed.

The code below tells the browser what files will be cached and how long to "hold" in the cache (local). Add to the top of your .htaccess file. Set how long the cache lasts according to the level of web updates in the "access 1 year" section, be careful not to set too long if your web update frequently.

Script htaccess

# Leverage Browser Caching
<IfModule mod_expires.c>
ExpiresActive On
ExpiresByType image/jpg "access 1 year"
ExpiresByType image/jpeg "access 1 year"
ExpiresByType image/gif "access 1 year"
ExpiresByType image/png "access 1 year"
ExpiresByType text/css "access 1 month"
ExpiresByType text/html "access 1 month"
ExpiresByType application/pdf "access 1 month"
ExpiresByType text/x-javascript "access 1 month"
ExpiresByType application/x-shockwave-flash "access 1 month"
ExpiresByType image/x-icon "access 1 year"
ExpiresDefault "access 1 month"
</IfModule>
<IfModule mod_headers.c>
<filesmatch "\.(ico|flv|jpg|jpeg|png|gif|css|swf)$">
Header set Cache-Control "max-age=2678400, public"
</filesmatch>
<filesmatch "\.(html|htm)$">
Header set Cache-Control "max-age=7200, private, must-revalidate"
</filesmatch>
<filesmatch "\.(pdf)$">
Header set Cache-Control "max-age=86400, public"
</filesmatch>
<filesmatch "\.(js)$">
Header set Cache-Control "max-age=2678400, private"
</filesmatch>
</IfModule>

W3TC Plugin (W3 Total Cache) - WordPress

For those of you Wordpress users, you simply install and set the configuration as below:

» Enable preview mode in general settings to view results without having to be applied live (optional).
» Enable browser caching fixed in general settings.


Please go to the "Browser Cache" section and set it like the picture below (this setting is the same as web), you can try for other settings, maybe every web requires different settings.

Save all settings, click stop preview and click preview or deploy and reload the web. To test, you can use the Google Page Speed ​​and YSlow plug-in. Note the changes that occur between using plug-in with no or if necessary try to change some settings.
» After testing, deploy and disable previews so that the settings are applied to the live version. For the next you can test optimization on web provider web speed test.

Blogpsot

If you are a blogspot user, keep in mind that actually Web Admin get this trick on other web and after applying this trick, admin feel change that is not too mean or maybe not even work, considering Blogspot server is fast in content distribution. If you want to try, please follow these steps:


login to your Blogger account

Please go to Dashboard -> Template -> Edit HTML
Add the following script between the "< head >" tags:


Script HTML

<include path="/assets/**.css" expiration="7d" />
<include path="/assets/**.js" expiration="7d" />
<include path="/assets/**.gif" expiration="3d" />
<include path="/assets/**.jpeg" expiration="3d" />
<include path="/assets/**.jpg" expiration="3d" />
<include path="/assets/**.png" expiration="3d" />


Keep Alive

For those who do not know what is keep-alive, keep-alive is a technique that allows TCP connections to stay alive and helps reduce latency in subsequent requests, so latency is caused by always requesting a new TCP for each request, by making TCP live on will force it using the same TCP and avoiding the new TCP usage. More simply, the communication process between a web server and a web browser that says "You can grab more than one file at a time".

To implement keep-alive, you can first ask your hosting provider and have the keep-alive feature enabled. If you are having trouble doing so then there are some other ways described below (use one):

Script Apache


#
# KeepAlive: Whether or not to allow persistent connections (more than
# one request per connection). Set to "Off" to deactivate.
#

KeepAlive On


#
# MaxKeepAliveRequests: The maximum number of requests to allow
# during a persistent connection. Set to 0 to allow an unlimited amount.
# We recommend you leave this number high, for maximum performance.
#
MaxKeepAliveRequests 100

#
# KeepAliveTimeout: Number of seconds to wait for the next request from the
# same client on the same connection.
#

KeepAliveTimeout 100


Add the above script to the apache config file (if you are allowed web hosting provider).
Website using htaccess technique because it is not allowed config file configuration apache. After you have configured it, try testing on Google PageSpeed, GTmetrix or other web speed testing sites.

GZIP Compression

There are several benefits that we get by enabling Gzip compression, because this method is the most popular to load our site faster by reducing more than 70% the size of blog or web page. Now most web or blogs use Gzip compression.
htaccess
You can use htaccess to enable the Gzip Compression method, how to add the following script to your htaccess file.

Script htaccess

# compress text, html, javascript, css, xml:
AddOutputFilterByType DEFLATE text/plain
AddOutputFilterByType DEFLATE text/html
AddOutputFilterByType DEFLATE text/xml
AddOutputFilterByType DEFLATE text/css
AddOutputFilterByType DEFLATE application/xml
AddOutputFilterByType DEFLATE application/xhtml+xml
AddOutputFilterByType DEFLATE application/rss+xml
AddOutputFilterByType DEFLATE application/javascript
AddOutputFilterByType DEFLATE application/x-javascript
AddType x-font/otf .otf
AddType x-font/ttf .ttf
AddType x-font/eot .eot
AddType x-font/woff .woff
AddType image/x-icon .ico
AddType image/png .png
W3TC plugin (Wordpress)
If you use Wordpress, then you just do the steps we've discussed earlier (browser cache). You just make sure the method is active or not by going to the Performance> Browser Cache .


PHP Scripts

We can also use PHP, by putting the following script at the top of the PHP / HTML script.


CDN

CDN (Content Delivery Network) or Content Delivery Network is a server network system to deliver existing content in an application / web to various visitors / users in various places so that data / content sent is received faster (data transmission does not have to be from a central server, but via the closest CDN).
In the picture above (extracted from gtmetrix.com) explains that with CDN, European users will be able to download static content via the closest CDN (located in Europe as well) so your site is faster because it does not need to download static content from the central server who are in America.

The problem is, as smart CDN buyers we have to be smart in choosing a CDN provider. Make sure the available space (CDN spot) meets our target market, the more it is not necessarily better, adjust to the level of needs of the area you want to reach.

Web stop the application of CDN, for wordpress users W3TC plugin has worked with one CDN provider and you live enable it If you have more budget you can consider this method because it is very significant results (from the experience of CDN users), please search on google the best CDN provider and please share your experience in comment field yes.

Content Elements

After the server has finished our optimization, then we move to the content. In this section we will do optimization that focus on the content, on the server that served in terms of content distribution is completed optimized, then by optimizing the content to be distributed will make web speeds increase very well.

Minify Script
The first part to be optimized is the script section in the form of HTML, CSS and JS (Javascript). This technique works by optimizing the script that will be used in the production site (used during live, open trial or debug).
When scripts are used in trial and debugging we will make our script as neat as possible by adding tabs, spaces and comments to make it easy to read and easy when handling script errors.

When the script is ready to use, then we can reduce the size of the script by removing spaces, tabs and comments. This technique is called minify, if you ever downloaded a script that when opened looks without spaces, the comment and feel stacked into a single line, then the script has been diminify.

Minify is not limited to one script file, if we have more than one CSS / JS script, we can combine all CSS / JS on one file and directly in minify (CSS and JS must be separated, join the like). To do this please follow the steps below:


Minify with Online Tool

We can use online tools such as jscompress.com, willpeavy.com/minifier/ and many others, live search on google. The way is quite easy, we just pastekan our script into the text area that has been provided and click submit, then the minify results can we use

W3TC Plugin (WordPress)

For wordpress users, we can use the W3TC plugin to do a minify, do the following:
- The first step please go to Performance> Minify.
- At this stage, we will play to optimize css and js in our wordpress, this second step to facilitate us in the selection of which files will be optimized, please click the Help button (Minify: Help Wizard) select the file, and end by click the Apply button & Close . Watch the picture after the help button is clicked. - The third step is to make sure the JS and CSS minify settings are enabled, if not you can check the combo box to activate it.

Blogspot User

For blogspot users, we can use manual techniques, namely by meminify with the Online Tool and reinstalled in the previous way.

Minify is the hardest part because we have to make sure the code in minify is not broken or keep running. We have to be patient in this stage, web nyekrip just managed to meminify little scripts, because many are damaged when all want in minify or join.


OPTIMIZING IMAGES

At this stage we will make the image in our website optimally well, we all know if the image is the main content that takes up space or space in the website because most of the filling in the web is the image. If we can optimize the use of images in the web then we've managed to reduce the server load so large.

There are several techniques that can be applied starting from reducing the size of the image by in-compress to utilize free cdn. About what steps we can take, please note the steps below:


Compress Image

Before you post a picture, you should first compress the image. Can use online tools or software, usually the image size will be reduced without unduly reducing the image quality.

Use Vector and PNG
If your web requires images that simply add illustrations and should not require real images or photos, just use a vector image and save as PNG. Because in this way, the image size will be very small and the image quality is good.

If you want to know how small the size is, please try downloading the header image in this article and check the image size.

Define Image Dimensions

The browser will start rendering the page before the image loads. If we have determined the dimensions (height and width) then the time it takes the browser in rendering will be faster. In this technique you can also use CSS to define image dimensions.

The trick is to use the <img> element, specify height and width.


CONCLUSION

For how to speed up blog website loading is not exactly simple, a lot of which must be optimized from the server side until the side of the elements that will be distributed. We do not need to do all the above optimization if some technique has answered the need.

This article will be updated if there is a new technique in speeding up the blog. If you have any questions, please fill in the comments field.

How to Hosting a WordPress Blog Website using CPanel

March 15, 2011 Add Comment
How to host a website or blog is very easy if we use CPanel, another story if we use a hosting venue or still not installed anything, we must prepare mysql (for those who use mysql), apache (for those who use php) other.

In the previous tutorial we have discussed how to register the domain, if not please visit the tutorial " How to Register Domain Blog Website Complete " and now it's time we discuss the tutorial how to web hosting or blog with cpnel. Oh yes, in web hosting or blog, whatever it is the kind of blog or its web, the way is still the same. The basic steps are as follows:

  1. Set up local database (can be dumped first)
  2. Prepare php files or similar (asp or other)
  3. Filezilla or other upload tool (ftp)
  4. Where to host (yes yes it is)
  5. Make sure the hosting place is available where our database and php running (usually there is cpnel for this)
  6. Setting the local database settings to the hosting database on the connection php file connection
  7. Testing and running

How to Hosting a WordPress using CPanel

Note the point number 5 above, so that the tutorial is not too widened, in this tutorial we just discuss how to web hosting or blog with cpnel. For those candidates where his hosting does not exist CPanel, will be made a special tutorial to install the mysql and apache database manual. For the type of blog or website we will be hosting in this tutorial is "WordPress".

Still remember the tutorial " How to Install WordPress Offline in Xampp Manual ", there we have installed wordpress locally on our pc, usually this way taken in the framework of development theme. In this tutorial, we will be hosting our local wordpress blog to a hosting provider which of course has provided CPanel.

By following the process in this tutorial, we will move all of our content on localhost (posts, pages, images, etc.), templates, and plugins from the local server to the hosting site.


Step One: Export the WordPress Local Database

The first thing we need to do is export the Local Database database. We will use phpMyAdmin to export. To access phpMyAdmin just type the address http: //localhost/phpmyadmin/in the browser and click the WordPress database. Next, click the Export button on the menu bar.


  • Note that what is exported is the database that we want to host
  • select export menu
  • Export menu
  • Select Custom
  • Select All Tables
  • Compression, select gzip

In the Export Method option select a custom method, which will give us more options to export the database. Select all tables for export and gzip for compression. Scroll down to the bottom of the page and press the Go / Send button to download the database.

Step 2: Uploading a WordPress File (WordPress Hosting)


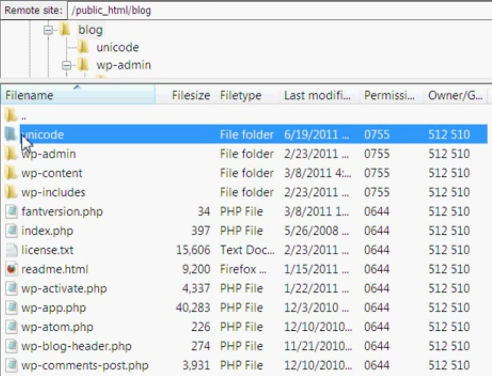
Now open FTP software and connect to web hosting. Once connected to the site, make sure we upload the files in the proper directory. For example if we want the site to be hosted on yoursite.com, then we will upload all the files in the public_html directory in the hosting server.


  1. Local wordpress web address
  2. Web hosting address
  3. Select all files, right-click and select upload

Step 3: Create a MySQL Database in Server Hosting

When FTP uploads WordPress files, we can all import the database to the hosting server. Because this tutorial discusses how to host a wordpress blog with CPanel, so we will discuss how to create a database using CPanel. Login to the CPanel dashboard and click on the MySQL database icon that can be found in the database section.

After creating the database, scroll down to the MySQL user section and create or add an existing user to the database. After adding the user, CPanel will take us to set the MySQL privilege for that user. Just give all the privileges to the user we just added or created earlier.

Step 4: Importing WordPress Database in Server Hosting

The next step in this process is to import the WordPress database. Please go to the CPanel dashboard, scroll down to the database section and click phpMyAdmin. This will take us to phpMyAdmin.

phpMyAdmin will show you the new database we have created earlier. Click on the Import tab in the top menu. On the import page, click on the file select button and then select the gzip database file (the gzip file we created in the previous step). Finally, press the Go button at the bottom of the page. phpMyAdmin will now import the WordPress database.

Step 5: Change the Web URL

Now we need to change the URL of the web or blog, so we can make the WordPress website can be accessed online. In phpMyAdmin, look for the wp_options table in the database we just imported in step 4. If you change the database prefix, then not wp_options.

Click on the browse button (browse) next to wp_options or links on the sidebar to open a page with a list of fields in the table wp_options. See image below:


Below the field options_name, look for row with value siteurl. Click the Change icon that can be found on the far left at the beginning of the line.

When you click the edit icon, a new window will appear. In the input box ' option_value', we will see local URL like: http://localhost/wordpress. Be careful to enter new site urls in this field, for example: http://www.yousite.com. Save by clicking the Go / send button. Do the same for a field options_name containing home.

Step 6: Setting Database Connection


Now that we have imported the database, and all our content has been uploaded, it is time to configure WordPress. At this time, if we try to access the site, then our site will menu error page in the form of database connection error.

Step 7: Fix Image Url and Broken Link with Update Database


Every time we move a WordPress site from one domain to another, or from a local server to a Hosting site, we will find broken and missing links that also cause problems with image loads. We can use SQL queries or use the WordPress Velvet Blues plugin .
For those who want to do it via SQL, here is a simple SQL query that can solve this problem:


Conclusion How to Hosting Blog or Website

tutorial How to Hosting Blog Website WordPress CPanel , may be useful for visitors. Oh yes, hopefully web that has been uploaded can run perfectly. Do not forget to immediately check the site to make sure that everything works as well as expected.

If there is anything to be asked about any problems and questions please feel free to comment below and we will try to help as much as we can.

For other settings, we can learn  through the Awesome Examples Fonts page . In the page, we can set the icons to rotate, reversed, given the border and much more. Similarly tutorial install and use the Awesome Font. Similarly tutorial how to install and use awesome fonts , Need to know if in previous version (version 3.2.1), Awesome Font changed the calling code of icons and also on the link from Netdna to MaxCDN , for that before deciding to update the icon, we must learn more about how to retrieve the link and call the icon (fear that there is another change).