How to host a website or blog is very easy if we use CPanel, another story if we use a hosting venue or still not installed anything, we must prepare mysql (for those who use mysql), apache (for those who use php) other.
In the previous tutorial we have discussed how to register the domain, if not please visit the tutorial " How to Register Domain Blog Website Complete " and now it's time we discuss the tutorial how to web hosting or blog with cpnel. Oh yes, in web hosting or blog, whatever it is the kind of blog or its web, the way is still the same. The basic steps are as follows:
- Set up local database (can be dumped first)
- Prepare php files or similar (asp or other)
- Filezilla or other upload tool (ftp)
- Where to host (yes yes it is)
- Make sure the hosting place is available where our database and php running (usually there is cpnel for this)
- Setting the local database settings to the hosting database on the connection php file connection
- Testing and running

How to Hosting a WordPress using CPanel
Note the point number 5 above, so that the tutorial is not too widened, in this tutorial we just discuss how to web hosting or blog with cpnel. For those candidates where his hosting does not exist CPanel, will be made a special tutorial to install the mysql and apache database manual. For the type of blog or website we will be hosting in this tutorial is "WordPress".
Still remember the tutorial " How to Install WordPress Offline in Xampp Manual ", there we have installed wordpress locally on our pc, usually this way taken in the framework of development theme. In this tutorial, we will be hosting our local wordpress blog to a hosting provider which of course has provided CPanel.
By following the process in this tutorial, we will move all of our content on localhost (posts, pages, images, etc.), templates, and plugins from the local server to the hosting site.
Step One: Export the WordPress Local Database
The first thing we need to do is export the Local Database database. We will use phpMyAdmin to export. To access phpMyAdmin just type the address http: //localhost/phpmyadmin/in the browser and click the WordPress database. Next, click the Export button on the menu bar.
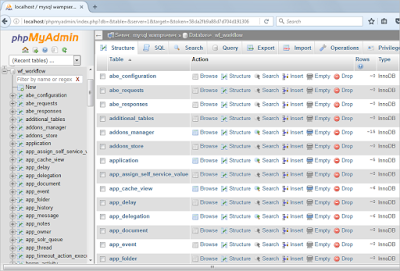
- Note that what is exported is the database that we want to host
- select export menu
- Export menu
- Select Custom
- Select All Tables
- Compression, select gzip
In the Export Method option select a custom method, which will give us more options to export the database. Select all tables for export and gzip for compression. Scroll down to the bottom of the page and press the Go / Send button to download the database.
Step 2: Uploading a WordPress File (WordPress Hosting)
Now open FTP software and connect to web hosting. Once connected to the site, make sure we upload the files in the proper directory. For example if we want the site to be hosted on yoursite.com, then we will upload all the files in the public_html directory in the hosting server.
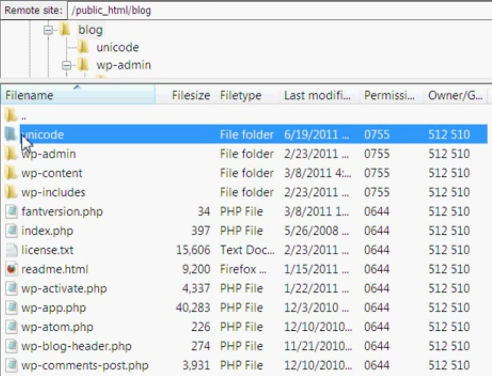
- Local wordpress web address
- Web hosting address
- Select all files, right-click and select upload
Step 3: Create a MySQL Database in Server Hosting
When FTP uploads WordPress files, we can all import the database to the hosting server. Because this tutorial discusses how to host a wordpress blog with CPanel, so we will discuss how to create a database using CPanel. Login to the CPanel dashboard and click on the MySQL database icon that can be found in the database section.
After creating the database, scroll down to the MySQL user section and create or add an existing user to the database. After adding the user, CPanel will take us to set the MySQL privilege for that user. Just give all the privileges to the user we just added or created earlier.
Step 4: Importing WordPress Database in Server Hosting
The next step in this process is to import the WordPress database. Please go to the CPanel dashboard, scroll down to the database section and click phpMyAdmin. This will take us to phpMyAdmin.
phpMyAdmin will show you the new database we have created earlier. Click on the Import tab in the top menu. On the import page, click on the file select button and then select the gzip database file (the gzip file we created in the previous step). Finally, press the Go button at the bottom of the page. phpMyAdmin will now import the WordPress database.
Step 5: Change the Web URL
Now we need to change the URL of the web or blog, so we can make the WordPress website can be accessed online. In phpMyAdmin, look for the wp_options table in the database we just imported in step 4. If you change the database prefix, then not wp_options.
Click on the browse button (browse) next to wp_options or links on the sidebar to open a page with a list of fields in the table wp_options. See image below:
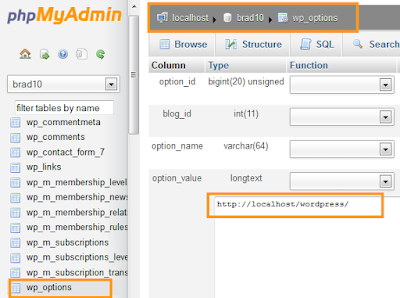
Below the field options_name, look for row with value siteurl. Click the Change icon that can be found on the far left at the beginning of the line.
When you click the edit icon, a new window will appear. In the input box ' option_value', we will see local URL like: http://localhost/wordpress. Be careful to enter new site urls in this field, for example: http://www.yousite.com. Save by clicking the Go / send button. Do the same for a field options_name containing home.
Step 6: Setting Database Connection
Now that we have imported the database, and all our content has been uploaded, it is time to configure WordPress. At this time, if we try to access the site, then our site will menu error page in the form of database connection error.
Step 7: Fix Image Url and Broken Link with Update Database
Every time we move a WordPress site from one domain to another, or from a local server to a Hosting site, we will find broken and missing links that also cause problems with image loads. We can use SQL queries or use the WordPress Velvet Blues plugin .
For those who want to do it via SQL, here is a simple SQL query that can solve this problem:
Conclusion How to Hosting Blog or Website
tutorial How to Hosting Blog Website WordPress CPanel , may be useful for visitors. Oh yes, hopefully web that has been uploaded can run perfectly. Do not forget to immediately check the site to make sure that everything works as well as expected.
If there is anything to be asked about any problems and questions please feel free to comment below and we will try to help as much as we can.
For other settings, we can learn through the Awesome Examples Fonts page . In the page, we can set the icons to rotate, reversed, given the border and much more. Similarly tutorial install and use the Awesome Font. Similarly tutorial how to install and use awesome fonts , Need to know if in previous version (version 3.2.1), Awesome Font changed the calling code of icons and also on the link from Netdna to MaxCDN , for that before deciding to update the icon, we must learn more about how to retrieve the link and call the icon (fear that there is another change).


