Showing posts with label WordPress Blog. Show all posts

How to Create new website

June 15, 2016 Add Comment

How to Create new website


On this occasion admin will share tutorials How to Create a Complete Website With Images, will be peeled in depth step by stage. This tutorial is suitable for you who still lay, if you are skilled you can skip directly on the optimization only.

Many options how to create a web, it is up to you in choosing a way, because it chooses how it depends on your goal to create a web. From the easiest to the hardest way it's all your choices, obviously every way there are advantages and disadvantages.

What is the Web


The Web is a page that contains both written content, images and videos that can be accessed online (of course according to privacy rules). For those of you who want to sell online or create an online store, want to create a personal blog that contains even want to start an online business it takes the ability to create a web, not hard to know how.


Why Must Have Web or Blog


Almost every business owner has a web to introduce themselves and their products to support the brand, existence and sales. If you are a businessman, do not let you miss the competitors who already have the web.

By knowing the advantages of having a web, it's time you decide your goal in creating the web. Why should you do this early? Because this will greatly affect the appearance, web structure and web end results.

Step - How to Create a Website


Okay enough introduction with web and blog, let's start step - step in how to make web. In order to understand and get maximum results learn slowly

 Specify a Domain Name and Give a Web Name

Domain is your web address, with that address people can visit the web by typing the web address in their browser. For example this web has address, which need to be considered in choosing a web address or domain is make sure the address is easy to remember and not too long so it allows visitors to remember the web address.

Tips on choosing Domains you need to consider:

  1. Most webs that want to aim business using the suffix. Com or. Co., If the suffix was already purchased by others and it was sold, try to buy it.
  2. You may also consider using the .biz or .net domain suffix if the .com domain is not available.
  3. If you have a specific purpose for transactions for example Indonesia area only then use .id, if the American area use .us and so on.
  4. Do not be too push in choosing a domain name, you can use additional words in front or a suffix. For example if the domain baca.com already purchased, try to add the word front me so baca.com or the ending to be bacak.com
  5. Buy a domain with a minimum period of three years, so no one is trying to take advantage of your negligence in the domain renew.
  6. If you are worried that your domain name is being misused, try buying some other domain suffix.

How to Sign / Buy Domain Name


After you decide the domain name you want, it's time you immediately buy the domain so that the domain is not triggered by other parties. Many places to buy domains, can be domestic or overseas, are clear in buying domains consider the following tips:
  1. Do not check the domain name repeatedly on the web that does provide domain name purchase services, in some cases the domain name will be immediately purchased by the web provider because it is considered a lot of demand so that the selling price will increase.
  2. If you want to buy abroad make sure already have a credit card, because the author's experience using paypal only credit cards that can be used (If there are other tricks please add in the comments column).


Determining Techniques How to Create a Website


Okay now you have a domain, the next is to determine the techniques in how to create a website, because in making the web there are several ways we can do and this greatly affects the results itself.

As already said in the opening words that every technique has its advantages and disadvantages, this is a straightforward technique for creating a popular website:

  1. Hosting and Free Domains
  • Blogspot: Please go to the tutorial " How to Create Blog in Blogspot Complete Picture "
  • WordPress.com: Just go to Tutorial " How to Make Blog in WordPress Free Complete "
  1. Hosting and Paid Domains
  • WordPress.org: If you intend to use CMS wordpress and upload it yourself like this web, please follow this tutorial until it runs out
  • Other CMS -Content Management System: Like CI (Code Igniter) for example CMS.
  • Hand Coding: Make your own from scratch

For more details please go to the tutorial " Some Ways to Make the Most Popular Web ". For those of you who opt for how to create a website using CMS WordPress or do not use the free hosting facility, please continue reading the tutorial. For those who do not, please take the essence of advanced tutorial, because basically the same is just different technique.


How to Install CMS WordPress On Offline PC


Before web hosting, we should download the WordPress CMS file at wordpress.org , by trying offline first, we will get benefits like:

  1. You do not have to connect online for frequent changes (often change theme, plugin optimization until theme optimization)
  2. By not being connected online, the speed in optimization is increased when compared to optimization after the web is hosted online.
  3. Obviously we've saved the quota
  4. Make sure everything is in accordance with the desired start of the design until the optimization of loading speed.
  5. If indeed there is a change, we can change it when the web is online, because the changes are only slightly.

Building a Website Structure


After you install CMS WordPress or other CMS, our next task is to start building website structure. This is very important because it discusses what pages you want to display on your website.
The structure of your web site depends on the purpose of creating your web. For example, if you create a web for the purpose of creating an online store, then the web page you need is as follows:

  1. Home Page (Home)
  2. Product page or catalog
  3. Company Info or about us
  4. Payment page
  5. Contact page / contact page
  6. Blog tool to influence your prospective customers.

How Web Hosting Has Been Created


Adding Content or Web Pages / Blogs


The web is online and we can add articles or tutorials. In this section will be discussed the importance of creating appropriate SEO content, what are the advantages of making an appropriate SEO article? Here are some important points:
  1. Content will soon be indexed by Google
  2. Content will have a good position in the SERP
  3. Not easily shifted by competitors who have similar content
  4. Increase your web ranking
  5. Increase the trust of potential customers (the content contains reasons that support your merchandise).
  6. Strengthen the Brand that you build, because if a lot of your content is weighted it will add strength to your brand.
  7. And many more

Web Optimization / Blog


The last thing is no less important is to optimize your web. Optimizations include:

  1. Blog loading speed
  2. SEO
  3. Blog Security
  4. Back-Up function

Conclusion How to Create a Website

Similarly tutorials How to Create the Latest and Complete Website , there are still shortcomings that the author has not conveyed due to this limited media. For other tutorials related to making the web can visit the Website Categories page .


Similarities and Differences Blog with Website

June 14, 2016 Add Comment

Similarities and Differences Blog with Website


Many are asking what similarities are also differences blogs with the website, let us discuss completely why there are both terms and what the differences and similarities. Before discussing more in-depth please note that blogs and websites have the same goal of providing content online and only distinguishing goals resulting in different features.

If we visit Wikipedia and find out about the definition of the website, try to find information on the type of website, then we will find it turns out blogs include the type of website. Blogs stands for Web Log which is essentially a website that functioned as an online diary, his own post is usually about a particular topic.

Understanding Blog Differences with Websites


Have you got a picture of what is a blog and website? Apparently according to Wikipedia blog is a website with special function. If you've ever encountered the web with an additional blog page it means a website that has a blog feature, unlike a blog that does not necessarily have a function like website. As with forums, forums are also types of websites with the same function as well as blogs, if we compare the blog with the website then we will find a little difference, because the website has a broad meaning and blogs have a narrow sense.

Regarding the importance of why we know the difference between blog and website, we will know our goal in making it, many free cms like wordpress that can be used as blog or used as another type of website, for example online store.

Suda is not it? if you want to discuss the website, must clear which type of website that would be discussed? Although a web that has only one page and its content is just the word "hello world" or even no word or content at all, it can also be called a web with a blank type of website hehehe. Essentially a website is a page that can be accessed with a specific address (IP address or Domain).

The most find on some forums or blogs mention that the website is static, content containing the introduction of services or organization, seldom updated and usually used for company profiles. If we refer back to Wikipedia about websites with content that only contains information about the introduction of a service or organization and is often used by companies including the type of corporate website or company website.


Objectives and Features of Website and Blog


Suppose we will discuss the blog type website with a corporate or corporate website, then we will clearly get the following differences:

Please compare between the numbers of each feature.


Blog Objectives and Features

  1. Blog is used as a media update information on a regular basis, usually each post aka tone date information on how the information is published. Information can be news, tips and tricks.
  2. Has a main page containing a list of published posts, the order can be from the latest or per category.
  3. Each post has a section to comment or comment field to provide feedback or questions according to the post content.
  4. Have a contact section as a medium to contact the author. Usually used for communication tools on questions that can not be submitted to the comment field.
  5. Has a simple design and want to highlight the post.
  6. Usually made purely as a medium of exchange of information from the author to the reader, the author here usually only the owner of the site or a few people, in contrast to the forum.
  7. Usually the cost incurred is small or even free.
  8. The reader will know the author and the type of blog.

Corporate Website Features and Features

  1. No information is updated regularly, even if there is additional information, usually not much about the company or the organization itself and that too rarely.
  2. Website has an elegant homepage and contains information about the types of services offered. Homepage will be in the optimization as attractive as possible to attract potential customers and build a good impression.
  3. There is usually no comment field for each published information.
  4. Have a contact page, just like a blog. Some even add a map or company location on the contact page section.
  5. The design is made elegant and stunning. This is to build the brand and the name of the company or organization itself.
  6. Made purely as a media promotion company and its services or as a place of complaints problems online services.
  7. The costs incurred are large, due to the high custom rate. Start domain and some additional functions.
  8. Readers will better understand the company and the type of service.

If anyone has both of these features, then called the web with the additional capabilities of blogs where the blog function is more intended to attract potential customers and give effect to the services or products offered. Beyond there are many who use blogs as a tool to attract potential customers and many who succeed, to note is the content of the blog must be pure support services within the company or organization and make the final action toward your product or service.

Creating a Blog or Website


It is very clear the similarities and differences is not it? If you want to create a website, please visit the tutorial " How to Create a New Website and Complete ", in the tutorial described in detail about how to create a website in general starting complete (wordpress and blogger), for the purpose of creating blogs, corporate website or others just pay attention to the characteristics mentioned above. For the initial tips you can learn about html and basic css to support custom managed web pages, or if you do not want complicated you can directly hire the services of programmers.

If you want to learn and browse the web or blog in circulation, you will find that to sell online or create a web of ecommerce type, you are not required to use cms or even to buy a domain, you can use blogger or blogspot as a selling medium.


Conclusion

Similarities and differences of blogs with the website will always widen as the technology progresses, the more advanced will be more features in the blog that makes the difference even further with the type of other websites. The point is a blog is part of the website, if anyone asked about the website to you, then ask first which type is asked?
So first our discussion about the similarities and differences blog with the website, if anyone wants to ask, please throw to the comment field below, please do not OOT alias out of the topic, if there are questions outside the topic please use the contact page.


How to quickly improve wordpress SEo in google ranking

March 11, 2015 Add Comment
It's easy to improve your website rankings in Google search engines in a short time if you really want to follow these WordPress SEO guidelines . In this article I will introduce an effective method to optimize your website in search engines and get a higher position in search results.

SEO (Search Engine Optimization) is an important part in promoting websites to rank better in search results and improve rankings on Google.


1. FIX THE SPEED OF YOUR WORDPRESS SITE


Site speed is important because many reasons people will tend to go if a site takes longer when opened and Google does suggest to increase the speed of the website.

To test and check website speed, you can use tools like Pingdom. If the speed of your website is very slow you can try to optimize with some easy ways below:
  • Use one of the popular caching plugins .
  • Compress and reload large image files on your site.
  • Use a good hosting service like Bluehost or SiteGround
  • Once you've done the above steps, please check your site's speed at Pingdom - you should see a significant improvement!


2. OPTIMIZE YOUR WORDPRESS SITE FOR MOBILE


Mobile has long overtaken the desktop in the number of users in browsing. And mobile users will always increase considering now the smartphone has evolved into a really sophisticated and easy tool to browse.

And the search engine giant Google knows it so they better value mobile-friendly sites with better rankings.

To have a WordPress friendly site for mobile is very easy, please use WordPress responsive theme, you can search for responsive WordPress theme here. And for maximum results you can change your WordPress site to AMP ( Accelerated Mobile Pages ) version with WordPress AMP or AMP for WordPress plugin.

3. OPTIMIZE TITLE AND DESCRIPTION


The title is the first thing that tells people what content on the page will be displayed. And search engines also feature more prominent titles than descriptions. So try to create an interesting title that represents the content of your article. And do not forget to include the keywords you shoot in the title.

After the title you need to optimize is the description of the content. Please make a short description of 150 to 160 words to represent the contents of your article. This description is also displayed in search engine results as well as titles, by making the content of an engaging description and containing keywords will improve your WordPress site ranking for Google search results.

You can use SEO plugins like All in One or SEO by Yoast to help you add space to optimize the titles and descriptions of each of your posts. Both plugins also provide a preview of how your title and description are displayed in search engines.

4. OPTIMIZE PERMALINKS OR URLS


Permalinks or URLs that people can read better than those with complex characters, as well as search engines prefer easy-to-read URLs. So make sure the permalink settings on your WordPress site are correct. Because by default, the WordPress URL structure looks like https://www.centerklik.com/?p=13 , and it is a bad example for search engines because it is not SEO friendly.

As in point 3 that URLs are also displayed in search engine results, create easy-to-read URLs or match titles that also contain keywords.

To optimize permalinks in WordPress, please go to Settings menu> Permalinks and select "Post name" or you can read more complete article about Permalink WordPress below.


5. FOCUS ON KEYWORDS


Keyword or Keyphrase is a word or phrase that reflects the post. In general, posts can get good results when visitors search for relevant phrases with keywords on the Internet, and large sites tend to have some search traffic coming from keywords.

Once you have selected the right keywords for your post, you should consider keyword density. If the keyword density is too small, search engines can not identify the words are keywords, however, if the keyword density is too large, search engines will consider that it is spam. So, try to embed the keyword with a normal amount in the post and make the keyword enter in some paragraph naturally.


6. CREATE QUALITY AND LONG CONTENT


New blogs really need to create really quality content with extensive content. Try to create an article with a complete explanation to compete with articles from other blogs that have been old. It's been proven that long articles get good rankings in search results compared to articles that are too short.

The ideal long content is over 800 words. If you can always create an article above 1000 words then it will be very good for the competition. And do not forget to organize your content with good writing settings by utilizing the h1, h2, and h3 format heading.

7. FILL ALT TEXT ON ALL YOUR IMAGES


Google Image or Google's image search accounted for about 10% more than all Google search traffic. Adding alt text to all images will bring some visitors through image search on Google and this will be an important factor to improve your site's ranking.

In addition, Google also uses alt text to determine the topic of a page, so it can help improve the ranking of non-image search.

To add a description to alt text is very easy, when you will add an image and select one of the images in the WordPress library then a column will appear on the right that contains alt text.


8. MAKE SURE THE SITE STRUCTURE IS CORRECT AND ADD INTERNAL LINKS


Navigating your site is very important for SEO. Google gives the highest ranking authority to the destination page by navigating the main menu of your website, as they are linked from the bottom for every page on your site. Make sure your navigation is clean, and do not connect too much of your main navigation to multiple pages, just a few of the most important ones.

Additionally adding internal links to important pages will take visitors to other relevant pages and make visitors linger on your site. This way it will also improve your WordPress site ranking in search engines.

And that's some important points you need to do for your WordPress website or blog. Follow all the ways above correctly so that your WordPress site rankings are in a good place and can compete with other blogs. Hopefully this article useful and good luck

How to Customize Your WordPress Theme with Child Theme

June 04, 2014 Add Comment

How to Customize Your WordPress Theme with Child Theme


Are you using WordPress theme on your website? No matter whether it is a free or a commercial one, if you want to customize it as per your requirements, then it is easily possible for you. Finally, you have decided to custom your WordPress theme as per your business requirements, you can make use of Child Theme that allows to keep your changes, so you don't make changes to the original theme.Before you opt for Child Theme, it is very much important for you to get complete information about it or how it works. There are lots of different reasons that WordPress developers have started using child themes.

It gives an opportunity to developers to customize a unique layout on top of another existing theme. Being a perfect solution for beginners, it enables people to play around with building their own themes that best meet with their business requirements.

What is Child Theme Exactly?

A WordPress child theme is a theme, which takes over the functionality of another theme that is also known as parent theme. Through this child theme, you are allowed to modify and add the functionality of that parent theme.

Being one of the safest ways to modify an existing them, child theme is also easy-to-use no matter whether you are looking to some minor changes or want to customize an entire theme. You can also develop a child theme instead of changing the theme files directly.

Generally, a child theme is a WordPress theme, which runs along with original WordPress theme and it overrule the parts of it as per your specified. Without changing the original one, you can easily modify with your required features.


Get Started with Child Themes

For your information, child themes are not as difficult as it sounds. One of the key benefits of using parent theme is that you do not have to write all the HTML/CSS from scratch. This theme automatically uses any template files that you have included like footer.php or sidebar.php. In any case, if you are missing, child theme will put all the same files from its parent.

However, this functionality also provides a complete range of features to customize already obtainable templates. This functionality is also excellent for touching up areas that are around your website for special events like adding designs for any special seasons like Christmas, Thanksgiving Day, New Years or more.

How to Do It?

Firstly, your original theme that is also known as parent theme, lives in your /wp-content/themes/directory. For an example: develop a child theme for WordPress default Twenty Twelve theme. After that, create a new directory along with the Twenty Twelve themes in order to develop a child theme.


All the directories require inside to be a valid child theme that is a style.css files with the following content:


Mainly, there are two important parts there:

Template: twentytwelve - that tells WordPress that this theme is a child theme of the twenty twelve theme.

@import url "/twentytwelve/style.css" that loads the parent theme style.css as a starting point.

Now, you can easily log into your WordPress dashboard and can see your Twenty Twelve Child Theme there and get it. Finally, you will get your very own Child Theme that has some cool features of your desire.

Got Your Own Child Theme & Thinking Now What to do?

Now, whenever you look forward to customize your own theme, you can do it in your child theme. In the parent theme, files in your child theme overrides files of the same name. So, if you want to change any file from your parent theme, you need to copy your child theme and then make your modifications there. The same goes for any template that may not be included in your parent theme. Now save them in your child theme and WordPress can use it.

So, this is the complete guide to customize Your WordPress theme using child theme that allows you to modify your theme with your desired features.

How to fix - WordPress on local host

April 30, 2014 Add Comment

How to fix - WordPress on local host


Opening a WordPress site after Apache port change returns HTTP 404 error (Not Found). This is a common issue with  WordPress users who have installed WordPress on local machine, then had to change the Apache HTTP port since other programs took over the HTTP port 80.

Here is a scenario for the issue:

1. XAMPP installed and configured. Apache web page is opening on http://localhost (default port 80)
2. Sites have been developed and placed under /htdocs including say, Drupal and WordPress sites.
3. Drupal and WordPress sites are working fine, and can be accessed on http://localhost/sitename

Now, suppose I needed IIS on the same machine for ASP developments. IIS is installed and it takes over the HTTP port 80. Or even Skype for that matter. Then the Apache HTTP port is changed.

4. Apache HTTP listen port is changed from 80 to 8080 in Apache's httpd.conf file. (See here: How to run Apache and IIS on the same computer)

5. Checked Apache service is starting with no issues using 8080 in the XAMPP Control Panel and the Apache default page opens, now at http://localhost:8080
6. Tested each site one by one - whether they are accessible using the new port 8080.

In my case, all other sites including Drupal sites, seems to embrace the port change well. They can be opened on the new port 8080 by accessing from the URL http://localhost:8080/sitename but not WordPress sites. After the port change, accessing WordPress sites using the url http://localhost:8080/sitename redirects to http://localhost/sitename. The browser returns HTTP 404 (Not found) error..


How to make WordPress sites work after changing Apache's HTTP port?

I haven't really dug in to see why WordPress will not work after the port change, but since the WordPress sites were working fine on port 80, but not on the new port 8080, I apply the same steps like I do when moving WordPress sites from local development having port 8080 to live server, that is, localhost URL edits.

The below steps are also required when moving WordPress site from local machine to live server, if local machine is using port 8080 for Apache.

1. Access phpMyAdmin: http://localhost:8080/phpmyadmin. Log in.
2. Click on the particular WordPress site's database.
3. Export it as SQL
4. Open the exported SQL file in a note editor (such as Notepad ++)
5. Do a Find & Replace:
Find = localhost
Replace = localhost:8080

6. Replace All
7. Save as: Save the file as a new SQL file
8. Back in phpMyAdmin:
phpMyAdmin > structure > select all the tables and drop
[If the edited SQL backup taken earlier is imported without dropping the tables, we get duplicate primary key error due to existing content.]

9. Import the edited SQL backup file
10. Check the WordPress site is accessible from the url http://localhost:8080/sitename
The WordPress site should now be accessible.


Best WordPress Plugin Required for Optimization

May 18, 2012 Add Comment
Are you already or still going to install WordPress and still confused to choose the best wordpress plugin that must be installed? Take it easy, in the best mandatory wordpress plugin tutorial for this optimization we will discuss what plugins are required to install for website optimization and wordpress blog.

There are thousands of plugins available in the plugin at wordpress.org or on the plugin maker's web site, for that amount, we may be confused to choose which wordpress plugin is best suited for use. In this best wordpress plugin tutorial does not provide a complete list of the best plugins with all purposes, but will discuss the list of basic plugins that must be installed.


The most important thing for web optimization is improving the reader's convenience by speeding up blog loading, improving SEO, web security and backing up. Keep in mind if more and more plugins are installed will make the blog more slow, so use wisely.


List of Best WordPress Plugins Required for Optimization


  • Blog Speed - List of plugins for blog speed optimization, by maximizing the use of this plugin, we can speed up loading blogs so as to make readers comfortable when accessing blogs.
  • SEO Blog - Got a blog for personal or for public? If for general, let's optimize to be able to dominate search engines like Google, Yahoo and Bing.
  • Blog Security - Security is a big deal on the web and WordPress. So it is recommended that we immediately install the security plugin to keep our site locked tight.
  • Backup Blog - What will we do if our website is broken? Yes, the right answer is to restore the backup. I do not know what to do if we do not have a backup.


WordPress Plugin To Speed Up Blog Loading


If our blog takes too long to load the blog page, we can lose visitors because most people expect blogs to be loaded quickly. Even Google combines page load speed in the algorithm to make page loads important for SEO.

There are some plugins that can speed up blog loading, but there are two best and most used wordpress plugins available, choose one and do not use simultaneously:


  • W3 Total Cache - Plugin that can optimize the performance of WordPress fastest and most complete. After we use W3 Total Cache, we will not turn to other plugin. Many blogs that have discussed how to setting, the next opportunity nyekrip will discuss it.
  • WP Super Cache - WP Super Cache is a static caching plugin for WordPress. This plugin generates html files that are directly processed by the server without a relatively heavy PHP script processing. By using this plugin, we will speed up WordPress blog significantly.


WordPress Plugin For Seo


There are several things that need to be done to optimize the blog for search engines, because WordPress basically does not have full features to support this.

This plugin is very important to set the meta description, keep the total letters, keyword optimization and much more. Here are two best popular wordpress plugins used, choose one:


  • All In One SEO Pack - One of the worpress plugins for SEO that has enough users. It's easy to configure, complete solution for all SEO needs.
  • WordPress SEO by Yoast - This plugin is an alternative to All In One SEO Pack plugin. In this plugin there are various SEO tools for WordPress blogs, such as setting SEO title, meta description, XML sitemap, breadcrumb and many more.


WordPress Plugin For Security or Securities


Already described above, because wordpress is open source so it has a security hole. In addition to always update wordpress, we must install some list of plugin below:


  • Akismet - Akismet is a plugin that must be owned to prevent our blog from spam comments. This plugin provides an opportunity for website owners to review all spam comments in the WordPress dashboard. We do not like spam as well as website visitors also do not like spam so make sure we have this plugin right away.
  • iThemes Security - This very popular plugin is known as "Better WP Security". It's very easy to use and has a quick setup because in making a number of security tweaks with just one click. There are many other security settings, we can tweak to lock the blog to a further level.


WordPress Backup Site or Web Plugin


Having a plugin for backups is a must, because no one can guarantee our web security free of damage or loss of data. Web damage can be an attack from a hacker or from a physical server hosting place.

Although we can make backups by copying all WordPress files manually, it's easy if we can set up automatically with WordPress backup plugin below:

BackWPup - Plugin This will ensure our blog will be completely backup. This wordpress plugin is completely free and easy to use with some very helpful features. There is also an option to upgrade to a premium version which will give us access to further levels.

If you want to create a free wordpress blog, you can create a blog at wordpress.com. For more details please visit the tutorial " How to Make a Blog in WordPress Free Complete ".

Thus the list of the best wordpress plugins for blog optimization, having the plugin above is a great first step in starting blog building. Do not stop on the plugin list above, start experimenting with other plugins, maybe the web also need plugins other than those mentioned above.


Comparison of Blogger Vs Wordpress, Who is the winner?

April 15, 2012 Add Comment
Comparison of Blogger Vs Wordpress, Who is the winner? - Blogging is now one of the activities that must be done every day for some people, especially for people who often interact with the internet. The blogger's motivation for blogging is also diverse, from just wanting to make the blog a personal diary to share life experiences, as a medium to share ideas with everyone as a medium of profit-making money, for the last yan is not uncommon bloggers make income from blogs as the main livelihood.

Talking about blogs will surely offend the blog platform what will be in use. For now there are several blog platforms that you can use for free, but among the various platforms there are 2 of the most famous of blogspot from google or commonly called with blogger and wordpress . Both of these blog platforms are now ranked top most favorite blog platforms in use, in addition to a variety of ease as well as the number of free blog templates available.

Usually the choice of the first blog platform in use by a blogger will be his favorite platform for a long time, unless the person finds a significant obstacle one day. At first the author uses blogspot to learn blogging but on the development of the needs of authors can not be in accommodation by a single blog platform, what exactly is the advantages and advantages of blogspot and wordpress ? And who is the best? For that reason we discuss the comparison of blogger vs wordpress below: 


Dashboard 


Blogspot : Currently blogspot already has a new dashboard view, the authors feel the new dashboard is easier to use and more responsive because it has been using AJAX technology, but to be able to enjoy this new dashboard javascrip on the browser must be active

Wordpress : The dashboard display used by wordpress has not undergone a lot of changes which means it is as easy as it is for users because it does not have to adapt to the new dashboard

Themes Customization


  • Blogspot : To beautify the blog look of many bloggers who change the look with their own designs or from templates available on the internet, for those of you who have more ability in the programming website blogger template can be changed in such a way up to the roots.
  • Wordpress : WordPress blogs can only be changed if you use self hosting wordpress hosted on your own server, if ana just use free service from wordpress you will only get some standard templates that you can use.


Import article


Blogspot : Blogspot can only import articles from other blogs that both use blogspot.
Wordpress : To import wordperss better articles, you can move and copy your articles from other WordPress, typepad, yahoo 360, Tumblr or blogger.

Image Storage


Blogspot : Storage of images provided by blogspot in one account is 1GB, blogger also do not have a special dashboard to see what files you have uploaded earlier, you may find it a little difficult to find your old pictures or pictures.
WordPress : For the WordPress storage business provides up to 3GB of space, and on the wordpress dashboard has also provided a look-up for your old picture-shots that you've uploaded.

Post By Email 


Blogspot and WordPress have been able to receive posts sent via email to display directly on the blog, this feature allows you if your blog has a freelance writer besides you. 

Advertisement


Blogspot : For advertising-advertising business in addition to your search blogger easier to use because of the blogger factor that is a subsidiary of google so you can easily install ads from adsense on your blog, where you will be paid every one who clicks on ads contained in the blog you, this may be your side business
Wordpress : The policy of wordpress to prohibit advertising in every account created may be a bit difficult for you in this case. To be able to advertise on your own blog can use wordpress danda self hosting.


Conclusion


Thus some explanation of blog comparison between wordpress with blogspot that you must know before creating blog. If you look further there are advantages and disadvantages of each blog platform, therefore maybe we can not say who is the best, but it is more appropriate if we choose according to the need, if you want a blog that can be changed templatenya easily and looking for additional income through advertising you can use blogspot . 

For those of you who want ease of use maybe you can use wordpress.
Especially for those of you who have more ability in terms of website programming WordPress may be hosting your own can be an alternative choice because it has advantages that are not owned by both platforms above blog. 

For the next, do not hesitate to try, and direct practice, because with practice you will feel yourself the advantages and disadvantages of blog platform above and can you customize to your needs, read the article How to create a blog on blogspot for tutorials to create blogs on blogger. 

How to Hosting a WordPress Blog Website using CPanel

March 15, 2011 Add Comment
How to host a website or blog is very easy if we use CPanel, another story if we use a hosting venue or still not installed anything, we must prepare mysql (for those who use mysql), apache (for those who use php) other.

In the previous tutorial we have discussed how to register the domain, if not please visit the tutorial " How to Register Domain Blog Website Complete " and now it's time we discuss the tutorial how to web hosting or blog with cpnel. Oh yes, in web hosting or blog, whatever it is the kind of blog or its web, the way is still the same. The basic steps are as follows:

  1. Set up local database (can be dumped first)
  2. Prepare php files or similar (asp or other)
  3. Filezilla or other upload tool (ftp)
  4. Where to host (yes yes it is)
  5. Make sure the hosting place is available where our database and php running (usually there is cpnel for this)
  6. Setting the local database settings to the hosting database on the connection php file connection
  7. Testing and running

How to Hosting a WordPress using CPanel

Note the point number 5 above, so that the tutorial is not too widened, in this tutorial we just discuss how to web hosting or blog with cpnel. For those candidates where his hosting does not exist CPanel, will be made a special tutorial to install the mysql and apache database manual. For the type of blog or website we will be hosting in this tutorial is "WordPress".

Still remember the tutorial " How to Install WordPress Offline in Xampp Manual ", there we have installed wordpress locally on our pc, usually this way taken in the framework of development theme. In this tutorial, we will be hosting our local wordpress blog to a hosting provider which of course has provided CPanel.

By following the process in this tutorial, we will move all of our content on localhost (posts, pages, images, etc.), templates, and plugins from the local server to the hosting site.


Step One: Export the WordPress Local Database

The first thing we need to do is export the Local Database database. We will use phpMyAdmin to export. To access phpMyAdmin just type the address http: //localhost/phpmyadmin/in the browser and click the WordPress database. Next, click the Export button on the menu bar.


  • Note that what is exported is the database that we want to host
  • select export menu
  • Export menu
  • Select Custom
  • Select All Tables
  • Compression, select gzip

In the Export Method option select a custom method, which will give us more options to export the database. Select all tables for export and gzip for compression. Scroll down to the bottom of the page and press the Go / Send button to download the database.

Step 2: Uploading a WordPress File (WordPress Hosting)


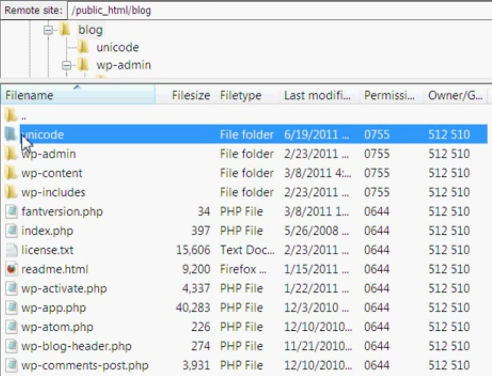
Now open FTP software and connect to web hosting. Once connected to the site, make sure we upload the files in the proper directory. For example if we want the site to be hosted on yoursite.com, then we will upload all the files in the public_html directory in the hosting server.


  1. Local wordpress web address
  2. Web hosting address
  3. Select all files, right-click and select upload

Step 3: Create a MySQL Database in Server Hosting

When FTP uploads WordPress files, we can all import the database to the hosting server. Because this tutorial discusses how to host a wordpress blog with CPanel, so we will discuss how to create a database using CPanel. Login to the CPanel dashboard and click on the MySQL database icon that can be found in the database section.

After creating the database, scroll down to the MySQL user section and create or add an existing user to the database. After adding the user, CPanel will take us to set the MySQL privilege for that user. Just give all the privileges to the user we just added or created earlier.

Step 4: Importing WordPress Database in Server Hosting

The next step in this process is to import the WordPress database. Please go to the CPanel dashboard, scroll down to the database section and click phpMyAdmin. This will take us to phpMyAdmin.

phpMyAdmin will show you the new database we have created earlier. Click on the Import tab in the top menu. On the import page, click on the file select button and then select the gzip database file (the gzip file we created in the previous step). Finally, press the Go button at the bottom of the page. phpMyAdmin will now import the WordPress database.

Step 5: Change the Web URL

Now we need to change the URL of the web or blog, so we can make the WordPress website can be accessed online. In phpMyAdmin, look for the wp_options table in the database we just imported in step 4. If you change the database prefix, then not wp_options.

Click on the browse button (browse) next to wp_options or links on the sidebar to open a page with a list of fields in the table wp_options. See image below:


Below the field options_name, look for row with value siteurl. Click the Change icon that can be found on the far left at the beginning of the line.

When you click the edit icon, a new window will appear. In the input box ' option_value', we will see local URL like: http://localhost/wordpress. Be careful to enter new site urls in this field, for example: http://www.yousite.com. Save by clicking the Go / send button. Do the same for a field options_name containing home.

Step 6: Setting Database Connection


Now that we have imported the database, and all our content has been uploaded, it is time to configure WordPress. At this time, if we try to access the site, then our site will menu error page in the form of database connection error.

Step 7: Fix Image Url and Broken Link with Update Database


Every time we move a WordPress site from one domain to another, or from a local server to a Hosting site, we will find broken and missing links that also cause problems with image loads. We can use SQL queries or use the WordPress Velvet Blues plugin .
For those who want to do it via SQL, here is a simple SQL query that can solve this problem:


Conclusion How to Hosting Blog or Website

tutorial How to Hosting Blog Website WordPress CPanel , may be useful for visitors. Oh yes, hopefully web that has been uploaded can run perfectly. Do not forget to immediately check the site to make sure that everything works as well as expected.

If there is anything to be asked about any problems and questions please feel free to comment below and we will try to help as much as we can.

For other settings, we can learn  through the Awesome Examples Fonts page . In the page, we can set the icons to rotate, reversed, given the border and much more. Similarly tutorial install and use the Awesome Font. Similarly tutorial how to install and use awesome fonts , Need to know if in previous version (version 3.2.1), Awesome Font changed the calling code of icons and also on the link from Netdna to MaxCDN , for that before deciding to update the icon, we must learn more about how to retrieve the link and call the icon (fear that there is another change).


WordPress Website / Blog Customization

April 10, 2008 Add Comment

WordPress Website / Blog Customization


Do you want to change the look of your WordPress site or maybe to put something like a banner or adsense code on your blog? In order to do this you need to know about three important things: template files, functions and CSS.


  • Template Files


These files are stored in a directory (wp-content/themes/template-name/). So if you are using "default theme", you need to access the files that are stored in "wp-content/themes/default/" directory.

There are several common WordPress template files you should know:

1.header.php

This file is responsible for the appearance of the top section of your blog. If you want to change the header image, you have to access this file. Not only that, this file is also the place to add Meta Tags.

2.footer.php

Similar to the header.php, this file is loaded everytime any page or post of your blog is accessed. It is used to store the HTML tags and the code for the bottom section of your blog.

3.sidebar.php

A sidebar is a section which is usually used to display site navigation. Depending on the theme you are using, a sidebar usually provides links to archives, pages and latest posts.

4.index.php

In fact this file is the main template file. When someone visits the homepage of your blog site, this file will be loaded. Then he/she will see the contents (not the source code) of this file. If you want to make the appearance of your blog become similar to a common website, where there is a static description on the homepage, you may try to put the static content in this file.

Besides those files, a theme usually has some other template files with different purposes. For example, the archives.php is a file used to display posts you made in the past. Then the search.php is used to generate search results.


  • Functions


A function is a blog of code to accomplish a specific task. In order to modify template files, you don't need to master any programming language. Although having a little knowledge in PHP, you can work faster. In WordPress, the name of a function is usually related to its purpose. For instance, "the_title()" is a function to display the title of a post and "the_content()" is used to display its content. Another example is "blog_info()" which is responsible for displaying the name or description of your blog, depending on the given argument (additional data).


  • CSS


Style Sheet is a facility to manage the format and layout of a website efficiently. Without using it, changing small things such as the font type or the background color of all of your webpages is a daunting task where you have to do it page by page. But with the existence of style sheet, one change you make can affect the whole site. You should know that in WordPress a different theme may have a different css file. You also need to know that some styles may be defined in the header.php file. If you are using the "default theme", you have to access the header.php file in order to change the background color or the header image of your blog, not the css file.

Finally, before you customize the templates, it is highly recommended to backup any files you intend to change. If something doesn't work properly, you can always go back to the original settings.