Comcast XFINITY TV App For Android

March 25, 2011 Add Comment

Comcast XFINITY TV App For Android


Comcast has officially released its XFINITY TV app for Android which allows users to browse current television listings and watch on-demand content. With XFINITY TV app, users able to watch favorite On Demand shows and movies right on Android devices for on-the-go entertainment. Xfinity TV app for Android comes with features such as ability to remote control cable boxes, record TV shows, schedule DVR recordings, search the VOD library, change channels, tune directly to on-demand programs in the catalog, and tuning to VOD on the TV.

Features of XFINITY TV app for Android:


  • Browse TV listings customized in your area.
  • Browse an On Demand library featuring thousands of titles.
  • Search TV listings and On Demand for any show or movie.
  • Filter content by genre, network, HD, free and much more.
  • Control your TV and DVR.
  • Conveniently change channels right from the app.
  • Tune directly to On Demand programs to watch on your TV.
  • Schedule DVR recordings of your favorite shows, series, and movies.
  • XFINITY TV app for Android is completely free and available in the Android Market, but does require a Comcast subscription to use. Users need compatible set-top box or DVR from Comcast that can accept commands from the app. Once installed XFINITY TV app on device and connected to Comcast account, users can control cable box or DVR in anywhere through the device.

How to Hosting a WordPress Blog Website using CPanel

March 15, 2011 Add Comment
How to host a website or blog is very easy if we use CPanel, another story if we use a hosting venue or still not installed anything, we must prepare mysql (for those who use mysql), apache (for those who use php) other.

In the previous tutorial we have discussed how to register the domain, if not please visit the tutorial " How to Register Domain Blog Website Complete " and now it's time we discuss the tutorial how to web hosting or blog with cpnel. Oh yes, in web hosting or blog, whatever it is the kind of blog or its web, the way is still the same. The basic steps are as follows:

  1. Set up local database (can be dumped first)
  2. Prepare php files or similar (asp or other)
  3. Filezilla or other upload tool (ftp)
  4. Where to host (yes yes it is)
  5. Make sure the hosting place is available where our database and php running (usually there is cpnel for this)
  6. Setting the local database settings to the hosting database on the connection php file connection
  7. Testing and running

How to Hosting a WordPress using CPanel

Note the point number 5 above, so that the tutorial is not too widened, in this tutorial we just discuss how to web hosting or blog with cpnel. For those candidates where his hosting does not exist CPanel, will be made a special tutorial to install the mysql and apache database manual. For the type of blog or website we will be hosting in this tutorial is "WordPress".

Still remember the tutorial " How to Install WordPress Offline in Xampp Manual ", there we have installed wordpress locally on our pc, usually this way taken in the framework of development theme. In this tutorial, we will be hosting our local wordpress blog to a hosting provider which of course has provided CPanel.

By following the process in this tutorial, we will move all of our content on localhost (posts, pages, images, etc.), templates, and plugins from the local server to the hosting site.


Step One: Export the WordPress Local Database

The first thing we need to do is export the Local Database database. We will use phpMyAdmin to export. To access phpMyAdmin just type the address http: //localhost/phpmyadmin/in the browser and click the WordPress database. Next, click the Export button on the menu bar.


  • Note that what is exported is the database that we want to host
  • select export menu
  • Export menu
  • Select Custom
  • Select All Tables
  • Compression, select gzip

In the Export Method option select a custom method, which will give us more options to export the database. Select all tables for export and gzip for compression. Scroll down to the bottom of the page and press the Go / Send button to download the database.

Step 2: Uploading a WordPress File (WordPress Hosting)


Now open FTP software and connect to web hosting. Once connected to the site, make sure we upload the files in the proper directory. For example if we want the site to be hosted on yoursite.com, then we will upload all the files in the public_html directory in the hosting server.
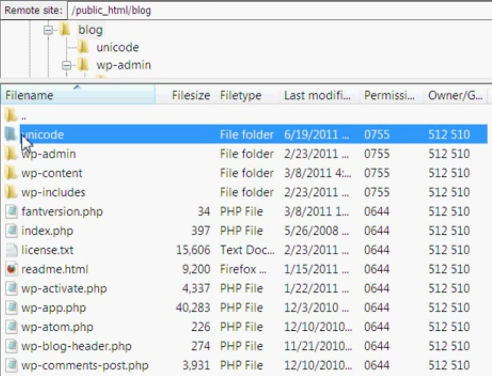


  1. Local wordpress web address
  2. Web hosting address
  3. Select all files, right-click and select upload

Step 3: Create a MySQL Database in Server Hosting

When FTP uploads WordPress files, we can all import the database to the hosting server. Because this tutorial discusses how to host a wordpress blog with CPanel, so we will discuss how to create a database using CPanel. Login to the CPanel dashboard and click on the MySQL database icon that can be found in the database section.

After creating the database, scroll down to the MySQL user section and create or add an existing user to the database. After adding the user, CPanel will take us to set the MySQL privilege for that user. Just give all the privileges to the user we just added or created earlier.

Step 4: Importing WordPress Database in Server Hosting

The next step in this process is to import the WordPress database. Please go to the CPanel dashboard, scroll down to the database section and click phpMyAdmin. This will take us to phpMyAdmin.

phpMyAdmin will show you the new database we have created earlier. Click on the Import tab in the top menu. On the import page, click on the file select button and then select the gzip database file (the gzip file we created in the previous step). Finally, press the Go button at the bottom of the page. phpMyAdmin will now import the WordPress database.

Step 5: Change the Web URL

Now we need to change the URL of the web or blog, so we can make the WordPress website can be accessed online. In phpMyAdmin, look for the wp_options table in the database we just imported in step 4. If you change the database prefix, then not wp_options.

Click on the browse button (browse) next to wp_options or links on the sidebar to open a page with a list of fields in the table wp_options. See image below:
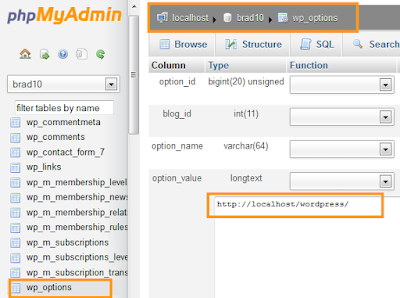


Below the field options_name, look for row with value siteurl. Click the Change icon that can be found on the far left at the beginning of the line.

When you click the edit icon, a new window will appear. In the input box ' option_value', we will see local URL like: http://localhost/wordpress. Be careful to enter new site urls in this field, for example: http://www.yousite.com. Save by clicking the Go / send button. Do the same for a field options_name containing home.

Step 6: Setting Database Connection


Now that we have imported the database, and all our content has been uploaded, it is time to configure WordPress. At this time, if we try to access the site, then our site will menu error page in the form of database connection error.

Step 7: Fix Image Url and Broken Link with Update Database


Every time we move a WordPress site from one domain to another, or from a local server to a Hosting site, we will find broken and missing links that also cause problems with image loads. We can use SQL queries or use the WordPress Velvet Blues plugin .
For those who want to do it via SQL, here is a simple SQL query that can solve this problem:


Conclusion How to Hosting Blog or Website

tutorial How to Hosting Blog Website WordPress CPanel , may be useful for visitors. Oh yes, hopefully web that has been uploaded can run perfectly. Do not forget to immediately check the site to make sure that everything works as well as expected.

If there is anything to be asked about any problems and questions please feel free to comment below and we will try to help as much as we can.

For other settings, we can learn  through the Awesome Examples Fonts page . In the page, we can set the icons to rotate, reversed, given the border and much more. Similarly tutorial install and use the Awesome Font. Similarly tutorial how to install and use awesome fonts , Need to know if in previous version (version 3.2.1), Awesome Font changed the calling code of icons and also on the link from Netdna to MaxCDN , for that before deciding to update the icon, we must learn more about how to retrieve the link and call the icon (fear that there is another change).


Windows 8 to Integrate Xbox Live Gaming and Entertainment Service

March 10, 2011 Add Comment

Windows 8 to Integrate Xbox Live Gaming and Entertainment Service


Xbox Live online multi-player gaming and digital entertainment service first introduced on Xbox 360 game console are one of the few markets that Microsoft really succeeds in. Thus it’s kind of expected that Microsoft wants to bring the online gaming and entertainment experience to all kind of devices and platforms. The long term initiative is called Live Anywhere where among targeted platform is Zune, Windows OS, and Windows Mobile phone, in addition to Xbox.

Microsoft already integrates Xbox Live into Windows Phone 7 as one of native feature, and will also integrate Xbox Live natively into Windows 8, as one of new features of Windows 8. In fact, Windows XP, Windows Vista and Windows 7 already has an online gaming platform based on Xbox Live called Games for Windows – Live, where all users also get to download Tinker PC game for free. But Games for Windows – Live is not come pre-installed on Windows, nor tightly integrate with Windows, and it’s mainly tilted towards gaming. In Windows 8, Xbox Live will be tightly integrated, and expands beyond gaming with digital content delivery to make Xbox Live the core entertainment service.

According to Mike Delman, vice president of global marketing at Microsoft’s Interactive Entertainment Business group, when he was interviewed by Seattle Times, “Xbox Live will be built into the PC. It will be the service where you get your entertainment. We were talking about it — you will not just see consoles and handhelds at this show next year, this show’s going to morph into other devices.” With the availability of Live TV and VOD (video-on-demand) from major cable networks and service providers, Xbox Live is gearing up to fight off increasing competitive market in providing entertainment services, chief among all, the iOS ecosystem of iPhone, iPad, iPod touch and Mac OS X with iCloud and cloud-based iTunes offerings.

Mike Delman also gave some clue on how Xbox Live services and content be part of Windows 8:

There will be a lot of similarities in design and service philosophy. Whether it’s us or Apple or anybody else, people want to be able to navigate through multiple devices in a certain ecosystem very seamlessly so we’re committed to that.

And the Xbox Live will also go the way of “buy one play it anywhere”. Xbox Live has already built based on cloud service concept, and with Xbox Live been integrated more and more platforms and devices, Microsoft promises Xbox Live will be the pervasive cloud media service across devices, that works with Windows PC as well as Windows Phone and Xbox.

It’s our job to make “buy a movie in one place and play it everywhere, buy a game in one place and play it everywhere.” Making things portable will be a big focus of ours.

Microsoft has already prepared Xbox Live to elegantly blending into the new Windows 8 and Windows Phone 7 tile-based user interface. During E3 keynote address, Microsoft revealed that Xbox Live will have a new Dashboard design, which is also based on the “live tile” on immersive Metro UI.

Backup+Restore+OEM+MAK Activation with 7Tokens Manager: Windows 7

March 07, 2011 Add Comment

Backup and Restore Windows 7 Retail, OEM and MAK Activation with 7 Tokens Manager


There is a limit to number of times activation of Windows 7 can be made online automatically, even though the product key been used to activate Windows 7 is genuine and legally paid for. The online activation limit brings inconvenient to Windows users who love to reformat and reinstall Windows more than frequently, causing them to fall back to time consuming and cumbersome phone activation with many numbers crunching. Callers have to enter installation ID which consists of a total of 54 numbers in 9 groups of 6 numbers with phone’s keypad, and then receive a confirmation ID made up of 48 numbers in 8 groups of 6 numbers to enter on Windows 7′s activation wizard.

To avoid the dreadful phone activation, and possibly to avoid contacting Microsoft for the purpose of activation to protect privacy, there is undocumented way to preserve current Windows 7 activation status by backing up several software licensing related files with the product key, and then restore them on the reinstalled Windows 7 system.

Windows 7 system activated by restoring backed-up activation status works exactly the same with system that is activated online or by phone, but in offline mod without the need to connect to Microsoft’s activation server or even Internet access.

Instead of having to manually copying the required system files and retrieving the product key, there is a software utility called 7Tokens Manager that automates the activation backup and restore procedure on Windows 7.

7 Tokens Manager, developed by Josh Cell, makes a complete backup of Windows 7 activation, which can then be used to be restore in a new installation to achieve instant offline activation. No further activation step is required.

Features of 7Tokens Manager:

  • Backup any type of activation license from retail, OEM or MAK distribution channels.
  • Automatically backup digital certificate, product key (serial number), tokens dat and other other license files.
  • Dynamic interface.
  • Very lightweight and fast, though it may takes up to 5 minutes to restore activation due SLMgr.vbs working.
  • Programmed with security features.
  • Compatible with all editions of Windows 7, namely Windows 7 Starter, Windows 7 Home Basic, Windows 7 Home Premium, Windows 7 Professional, Windows 7 Enterprise (not support KMS activation though) and Windows 7 Ultimate).